
So, finally, you have purchased a web hosting server and domain. You’ve also configured domain name with hosting server and installed WordPress. But there are some essential things that you need to do after installing WordPress.
If you don’t take these steps, you might encounter WordPress security issues, lack of functionality, and poor site performance.
Attention:
So if you want to make your site secure and increase your site performance, then it’s important to configure your WordPress settings correctly.
In this article, I will be listing out some essential things that you need to do after installing WordPress. It will take only 10 minutes to set up everything.
Ok, let’s get started: –
15 things to do after installing WordPress
#1. Change Your Permalink Structure
According to Matt Cutts, the ideal structure of the permalink must have the following features
- If you use the .html extension, then it would improve your SEO
- Keep your URL small and clean
- Don’t use so many stop words (like in, too, etc..)
- Permalink structure should be like this (https://www.yourdomain.com/post-name)
- Include focus keyword into your URL.
- According to Matt Cutts, the ideal length of a URL is 4 to 5 words.
If you’re using the dates in your post URL for years, then it’s advisable not to change your URL structure because it might harm your SEO and rankings. If you do so, you might get tons of 404 page not found errors.
So the best way to take the benefits of URL structure is to customize the URL structure before you start publishing the articles.
How do you change your permalink structure? Here is a one-step process that you can follow.
First of all, open your WordPress dashboard and head to “settings > permalinks”.
As you click the permalink option, you will see these options given below: –

Now select the option “post name” and click the save changes button. That’s it.
#2. Fill out the general information of your site like Site URL, tagline
In this section, there are 12 things to do with WordPress.


- Site Title: Put your site name that will be displayed on the google search while searching for your site name.
- Tagline: A tagline is a little description of your site. Also used to convey the essence of your site.
- WordPress Address: This is the address for the WordPress directory to call the WordPress media files and other core pages like the admin page. Either you can keep both site address and WordPress address similar or different. However, I keep both the addresses exactly the same.
- Site Address: This is your actual site URL that is publicly available for users, search engines to retrieve the data from the directory.
- Email address: You’re also asked for a valid email address to keep you informed about any new updates.
- Membership: If you want to allow a user to register for your site to become a member, then check this box.
- New user default role: This feature allows you to assign the user role to the new user. Suppose you want to increase the position from a subscriber to the contributor, then just attach the role using this feature.
- Site language: It defines the WordPress dashboard language. You can change the dashboard language according to your suitability.
- Time Zone: Select your time zone where you reside. You can also select the UTC + 0 for universal time. But for local time, offset your UTC according to Greenwich Mean Time.
- Time format: Used to customize the time format. You can check out the Documentation on date and time formatting to set the time format.
- The week starts on: Set the starting day of the week. You can choose Monday or maybe another day depending on your schedule.
- Date format: This setting is used to display the time on your site. You can prefer any date format.
#3. Writing Settings
Once you fill out the general settings, now it’s time to get on the writing panel. Here you see the following parameters…
- Default post category: By default, WordPress uses the “Uncategorized”. Although, you can change the default post category according to your requirement.
- Default post format: Keep your post format standard.
- Set up an email account: If you want to publish your blog post via mail, then you could create your email account. It is required if your site has been banned by the government. In that case, you need to set up your secret email account to publish your content. However, you don’t need to set up this account. But in case if you do, read this guide to create an email account to publish content on your website.
- Update services: This is the most critical configuration to set up. WordPress has a feature to automatically notify the following update services when you publish a new post. [paste these services in the update service section and save the changes]
http://rpc.icerocket.com:10080/
http://blogsearch.google.com/ping/RPC2
http://1470.net/api/ping
http://api.feedster.com/ping
http://api.moreover.com/RPC2
http://api.moreover.com/ping
http://api.my.yahoo.com/RPC2
http://api.my.yahoo.com/rss/ping
http://bblog.com/ping.php
http://bitacoras.net/ping
http://blog.goo.ne.jp/XMLRPC
http://blogdb.jp/xmlrpc
http://blogmatcher.com/u.php
http://bulkfeeds.net/rpc
http://coreblog.org/ping/
http://mod-pubsub.org/kn_apps/blogchatt
http://www.lasermemory.com/lsrpc/
http://ping.amagle.com/
http://ping.bitacoras.com
http://ping.blo.gs/
http://ping.bloggers.jp/rpc/
http://ping.cocolog-nifty.com/xmlrpc
http://ping.blogmura.jp/rpc/
http://ping.exblog.jp/xmlrpc
http://ping.feedburner.com
http://ping.myblog.jp
http://ping.rootblog.com/rpc.php
http://ping.syndic8.com/xmlrpc.php
http://ping.weblogalot.com/rpc.php
http://ping.weblogs.se/
http://pingoat.com/goat/RPC2
http://rcs.datashed.net/RPC2/
http://rpc.blogbuzzmachine.com/RPC2
http://rpc.blogrolling.com/pinger/
http://rpc.icerocket.com:10080/
http://rpc.newsgator.com/
http://rpc.pingomatic.com
http://rpc.technorati.com/rpc/ping
http://rpc.weblogs.com/RPC2
http://topicexchange.com/RPC2
http://trackback.bakeinu.jp/bakeping.php
http://www.a2b.cc/setloc/bp.a2b
http://www.bitacoles.net/ping.php
http://www.blogdigger.com/RPC2
http://www.blogoole.com/ping/
http://www.blogoon.net/ping/
http://www.blogpeople.net/servlet/weblogUpdates
http://www.blogroots.com/tb_populi.blog?id=1
http://www.blogshares.com/rpc.php
http://www.blogsnow.com/ping
http://www.blogstreet.com/xrbin/xmlrpc.cgi
http://www.mod-pubsub.org/kn_apps/blogchatter/ping.php
http://www.newsisfree.com/RPCCloud
http://www.newsisfree.com/xmlrpctest.php
http://www.popdex.com/addsite.php
http://www.snipsnap.org/RPC2
http://www.weblogues.com/RPC/
http://xmlrpc.blogg.de
http://xping.pubsub.com/ping/
http://rpc.copygator.com/ping
5. Custom content-type: If you want to show a different type of content on your page then enable this feature.
Now you’ve successfully configured “General” and “writing” settings. Next, complete the reading section.
4. Reading Setting
This section provides you with an opportunity to change the way your homepage and feed looks. However, you can keep the settings as it is. But if you want to make your homepage static and also disallow the search engine to index your site, then you can configure this setting panel.
You can import these settings for a better user experience. Make sure you never check the “search engine visibility” option because it discourages the search engines to index your site.

5. Discussion Settings
In this section, you can control your comment section. There are tons of options that you could check and uncheck to allow or disallow people to comment on your article.
If you don’t want the users to comment on your post, then you can uncheck the “allow people to comment on your new post.”
You can refer to this guide to fill out the whole section accurately
https://codex.wordpress.org/Settings_Discussion_Screen
6. Stop The Post Revision
The more you update your post, the WordPress stores more post revisions. However, they don’t harm. But WordPress assigns some memory to store these revisions which could make your site performance poor.
If your database space is limited, then I suggest you stop the post revision to save the memory.
To do so first of all, Open your CPANEL, and in the PUBLIC_HTML folder, find the “WP_CONFIG.PHP” file.
Once you find, add the following code carefully.
define(‘AUTOSAVE_INTERVAL’, 300 ); // seconds
define(‘WP_POST_REVISIONS’, false );
Benefits of stopping post revisions
- Save database storage
- Speed up your site loading
- Increase site performance
7. Important Plugins To Download
WordPress offers countless plugins to excess some extra features to make the site flexible. When you customize your new site, your site needs additional support to provide some additional privileges to the visitors.
There are some essential plugins that you must download before publishing any post: –
- SEO by Yoast plugin: This is mandatory. Every webmaster should install this plugin. Once you configure Yoast SEO, it will take care of everything regarding SEO.
- Security plugins: Wordfence, Sucuri, and Sitelock are the three most common security services that isolate your site from hackers. Currently, I am using Sitelock which costs me $7.5 per month. If you want to configure Sitelock, then read these guides
- Speed optimizer plugin like CDN: Use WP fastest cache plugin to increase your site performance. You can either install W3 total cache or WP super cache plugin for the same purpose. But I suggest you use WP fastest cache Because it is straightforward to configure this plugin with any CDN service like MAXCDN.
- Anti-spam plugin: Use the Akismet plugin to keep your site secure from spam comments and contact form details. It compares any comment entry against their global database of spam to isolate your site.
- Broken link checker: This plugin keep an eye on all inbound and outbound links to make sure that links are not broken.
- SUMO ME: This plugin is an all-in-one pack that allows you to create an email list, contact form, live chat, and also give you free access to social media sharing buttons. If you don’t want to install this plugin, then you can use the Jetpack plugin which has similar features of Sumo-me.
- WP insert: If you’ve monetized your blog with AdSense or any other monetization network then you can use this plugin. This plugin gives you an easy configuration to put Ad code.
- WP smash: I know you upload tons of images on your server. But the more media files you upload, the more space it will occupy. So, to cut off the image size, you need to compress them. WP smash is the best plugin for this purpose. This plugin compresses your images and save a massive amount of memory and increase your site loading time.
Attention: Best WordPress plugins that you must use
8. Choose A Suitable Theme That Fits Your Business
Ok finally you’ve done the necessary configuration, now it’s time to choose a good looking WordPress theme that best suit your business type.
Before you activate any theme, make sure your theme must have all the essential features that are mandatory.
Things that you need to remember before choosing any theme
- Before activating any theme, check reviews to get to know the performance of a theme.
- List out essential features of the theme So that you can find your theme according to your requirement.
- Never use heavy themes because it may increase the site loading time.
Attention:
9. Schedule WordPress Backup
If you start publishing a blog post, then it’s mandatory to keep them secure. For that, you need to schedule your backups. WordPress provides you with plenty of plugins that you could use to keep your post scheduled for backups.
You can keep your posts secure by installing and scheduling any of these plugins: –
- Backup buddy – This plugin is premium
- UpdraftPlus
- Duplicator
- Backup WordPress
10. Clean Up The Default Pages Or Posts If Exists
WordPress comes up with some default sample pages, posts, and widgets. Remove unnecessary pages, posts, and widgets.
11. Insert Your Site Identities Like Logo And Favicon
When you download a new theme, you need to customize it. However, every theme has similar customization options that you can find in Appearance > Customize.
![]()
As you click to customize the link, you’ll see a couple of options like site identity, header, menu, background color, and widgets, etc.
You don’t need to go anywhere, just click the site identity option. However, the name of the navigation “site identity” may be different for a different theme.
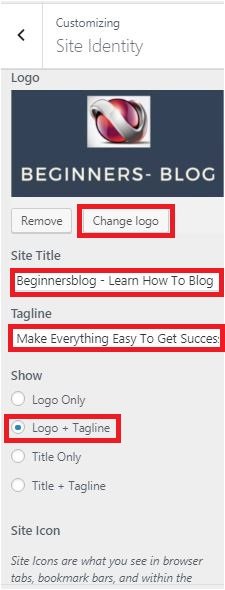
Once you click site identity, you have to upload your site logo and some other options related to site identity.
Simply upload your site logo, site icon, and give any tagline to your site. That’s it.
12. Customize Menu
When a user visits your site, he uses the menu to navigate. If you don’t provide navigation, you might lose your visitors. That’s why you must always use the menu bar.
WordPress provides you with a separate section to customize the menu as per your requirements. You need to drag and drop.
For that, first, go to Appearance > Menu
Click the “create a new menu.”
As you click the “create new menu” link, you’re asked for a menu name.

Put any name that you want. For instance, I give “XYZ”.
Now click the “create menu” button.
Finally, you can add any category, or custom link to your menu. Once you’ve done, WordPress will add this menu to the header of your theme.
If you want to delete your current menu, then click the “delete menu” shown below the menu settings.
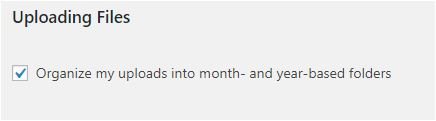
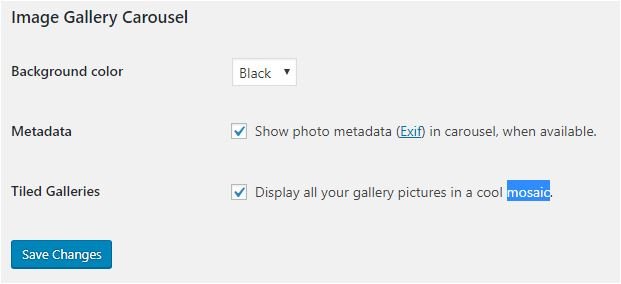
13. Configure WordPress Media
However media settings are not necessary but, if you want to change the default settings, then you can find the media option located under settings > Media.
There are mainly three options
- Image sizes – When you upload an image to your media library, then this option allows you to set the maximum dimension to use.

- Uploading files: If you want to organize your uploads according to month and year-based folder, then check this option. Otherwise, uncheck it.
- Image gallery carousel – Choose background color and enable the metadata and tiled galleries features by checking both the options.
14. Complete your WordPress Profile
This section is for the admin. It is a mandatory step to take after installing WordPress. You can find this under the “Users.”
Here you’re asked to provide your email, nickname, Gravatar, social media accounts, and a little biography.
15. Create Some Mandatory Pages
Besides settings, add some important pages like “About Me”, “contact us”, “privacy and policy”.
16. Create an XML sitemap
Once you start publishing your articles, you’ll need to create an XML sitemap and submit it to Google.
It is important because it increases the indexing rate and ranking as well.
If you don’t know how to create a sitemap and submit that to Google, then I refer you to read this guide…
17. Add A Contact Form
Sometimes you like the users to ask questions. If yes, you need to install a contact form plugin. This plugin will take care of everything.
This plugin allows you to contact the users directly via email. You can also answer questions via email. You don’t need to open your WordPress dashboard over and over again.
The best plugin that you could use: –
- Contact form 7
- Jetpack
- Ninja forms
CONCLUSION
I’ve covered all the possible steps that you should take after installing WordPress on your server.
In general, if I recapitulate the whole thing that you must take after just installing WordPress, then the procedure would be like this…
- In the first step, configure the settings panel. In this panel, you will find many options like General settings, writing, reading, and discussion, etc.
- Once you finished the first step, the next step is to get into the “Users” panel and complete your profile.
- By the end of completing these two steps, you have done your basic configuration.
- Next, install a simple theme and customize it parallelly. Here you need to upload the site logo, create a menu, and another type of stuff.
- Delete default pages.
- Now, install useful plugins.
- Create additional pages
- Schedule your site backups to make a second copy of your site.
If you like this post, then please do share on Facebook, Twitter, LinkedIn, and Reddit.


2 thoughts on “15 Mandatory Steps To Take After Installing WordPress”
Very good writing in detail. I am using WP Super Cache. Updraftplus tried many times, but memory exhaust problem. Tried increasing memory in php.ini. Not success.
Sumome has e-mail collecting popup, subscribe etc which Jetpack don’t have.
Thanks for your response…
I glad you fill out the missing part
Comments are closed.