
Ok, now you have decided to set up MAXCDN with WordPress. But don’t know where to start. No worries, I’ve prepared a MAXCDN tutorial to install MAXCDN with WP fastest cache plugin. It will take only 5 to 10 minutes to walk you through with this guide.
In this guide, I’ll also describe how does MAXCDN works? How to create a pull zone and how to set up MAXCDN with WordPress using WP fastest cache plugin.
Before you started, let’s talk a little bit about what is CDN and how does it help you improve your overall SEO and ranking.
What is CDN and how does MAXCDN work?
It’s a networking system distributes your content to multiple servers situated at different-2 geolocation. It reduces the server response time for the browser and serves instant results to users.
The working principle is simple when a visitor visits your website. Browser requests to a server and the server send a response code to ensure that corresponding data is delivered to the browser. It may take 200ms second or more. If your hosting server is not excellent, it may take up to 2 seconds. Which increases the loading time, resulting in a severe user experience.
But if you use MAXCDN or any other CDN (content delivery network) services then loading time could be minimized up to 170% to 180%. When you set up CDN service on your website. CDN sends your website’s static copies to their global servers. These servers are located at the different-2 geolocations. After that, your site will be available on multiple servers.
So, let’s suppose someone visits your site from China. And your original server is located in the UK. In the absence of CDN, your server response time would be higher because it takes time to receive the data from the UK to China.
On the other hand, if you use CDN, then the browser looks for the nearest server where your site stores. Once the browser discovers your site’s locality, a request is sent to that server and the browser receives the data and serves you instantly.
Why should you use MAXCDN?
Google has confirmed that ‘they prefer fast and safe results.’ What do you think? Studies show that to get massive growth, you should make sure your website is optimized for speed. If you’re on WordPress, then it’s easy for you to speed up your results on google. Because it provides you with a couple of plugins that you can use to improve loading speed.
- It increases the loading speed of your site
- Decrease the server response time
- Improve your SEO
- Enhance your site performance
- Increase search rankings. It has grown SEO and traffic by 400% in just two months
- It’s super easy to set up with WordPress
- Improve user experience
- If your original server isn’t available at your desire geolocation, then you can use CDN to spread your server locality to improve your SEO and performance.
- Purge your content instantly.
- Google considers speed as a ranking factor. MaxCDN has increased my site speed by 180%.
Attention:
You must have seen a lot of CDN that promises you to boost your site’s loading speed up to 200%. But in reality, they serve you the worst services.
The best thing is to do thorough research and find the best CDN service for your businesses or website. You need to consider these things before buying any CDN network.
The salient points that you must remember while purchasing any CDN.
- The very first thing is ‘check for (Pop) point of presence.’ For instance, suppose your original server is located in the US. But you like to serve your business in UK, China, Japan, and Australia. Then your CDN must have these points of presence. So, that browser can instantly fetch your web stuff.
- Never forget to check ‘how many Pop servers are available.’
- Check for reviews to ensure that your CDN server is reliable.
- Customer support
- Choose a suitable and affordable CDN. MAXCDN is an example of a cheap CDN.
- Also, look for ‘how much data bandwidth they are providing.’ If you’re running a small site that is generating 6,000 to 10,000 visits per month, then it’s enough to buy a 100GB bandwidth package. But for handling a massive amount of traffic, you need to purchase 5TB to 25 TB or more.
- Security
- Last but not least, ask others who are already using this service and then tried to figure out which one suits you.
Now I’m going to serve you a MAXCDN tutorial that could help you to install MAXCDN with WordPress using a plugin.
Although, there are a lot of plugins that can use for connecting MAXCDN with WordPress. Some of them are listed below
These three are the best cache plugin for WordPress. You can choose any of them. But here I’ll tell you how to configure MAXCDN with WP fastest cache.
Step by Step Guide To Setup MAXCDN With WordPress Using WP Fastest Cache
Why I’ve selected WP fastest cache plugin because it’s effortless to configure. One can easily connect MAXCDN with this plugin.
Ok, let’s get started.
1st step – (MAXCDN pricing)
To get started, buy the best CDN package that fits you. I like MAXCDN pricing because it provides you beneficial packages. My site is not big, so I’ve purchased the entrepreneur plan.
This plan has three packages. So, you can make your choice wisely. The entrepreneur plan is mostly for WordPress bloggers and small companies.

2nd step – (How to buy MAXCDN server)
Once you’ve selected your plan, it’s time to buy it. For that, create the MAXCDN account by clicking the signup button just below the package features.
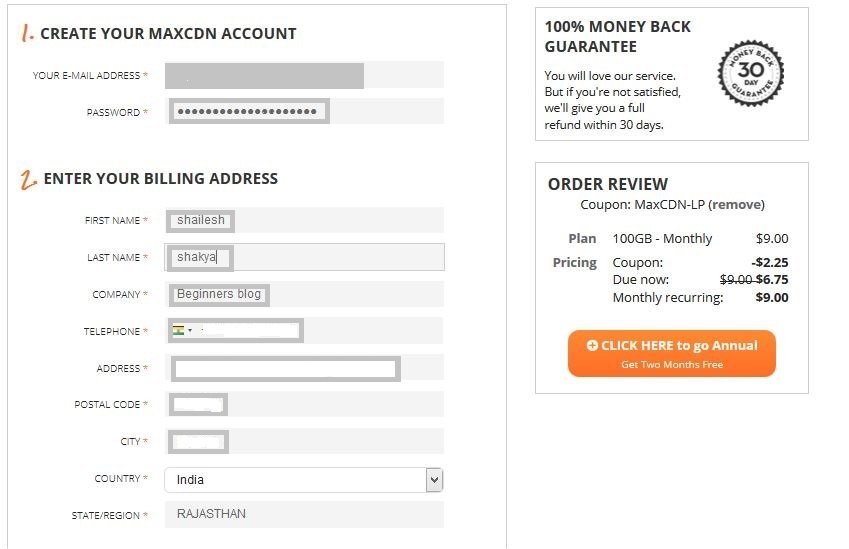
As you click the signup button, it will take you to another page where you see the following details.
- Account details: Put your valid Gmail ID and choose any password that you want.
- Billing address: Here you’re asked for your current address. Put your real name and address carefully.
- Add additional services to your account: if you don’t want to add any other service, then don’t make any changes just skip this option
- Enter your billing information: Fill out your card details carefully.
- Finally, click the orange color ‘create an account and get started.’

3rd step – (Create pull zones)
After entering into the MAXCDN control panel, your first task would be ‘creating pull zones.’ Sound’s weird! Don’t know what is pull zone? Don’t worry, let me explain to you
There are two types of CDN the first one is ‘pull CDN’ and the second one is ‘push CDN’.
Pull type CDN
As the name itself explains that data is pulled from your original server. Here you don’t need to upload your website’s files on the CDN server. Just create your pull zones and CDN will automatically rewrite your origin URL locations to their corresponding server location.
Old URL: – mechaplanet.org/xyz/
CDN URL: – cdn.mechaplanet.org/xyz/ (cdn is a subdomain. This is your choice what subdomain do you want to point to. For an instant, I choose CDN. You can either choose another subdomain like blog, file, etc.)
Every time a visitor makes a request, CDN first goes to your origin server where your original files are stored and pull the corresponding data to serve the visitor.
Push type CDN
Push CDN works differently. You can consider it as a new server. Here you need to upload your files to this new server using FTP. However, it could be done either automatically or manually.
If someone makes a request, CDN doesn’t need to pull the data from the origin server because all the files are now available on CDN’s server. CDN just pushes them forward to travel the path between the browser and the CDN server.
Both CDNs are good. But if you are running a blog then creating a pull zone would be better than a push zone.
Hopefully, now you know the types of CDNs. Ok, let’s move on to continue the earlier discussion.
How to create MAXCDN pull zones
Log in to your account and head to the zones > create a pull zone
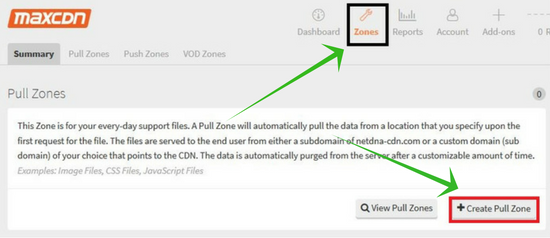
As you click the ‘create pull zone button’, you will see the following screen given below.

Here you’re asked for three things
- Name: This is your pull zone name. In case, if you’ve got a lot of pull zones, then it will help you to identify the desire pull zone.
- Origin server URL: Put your origin server URL. It is your exact site URL. In my case, it is ‘https://beginnersblog.org/’. Your URL should start with ‘HTTP’ or ‘https’. Don’t forget to put the trailing slash (/) at the end of the URL because this is your root domain.
- Level: this is a little description of your pull zone. It is similar to tags. For example. ‘pull zone for Beginners blog.’
Once you’ve done, click the ‘create’ button. Within a few seconds, it creates a ‘pull zone’, and you’ll find a message called ‘pull zone has successfully created.’
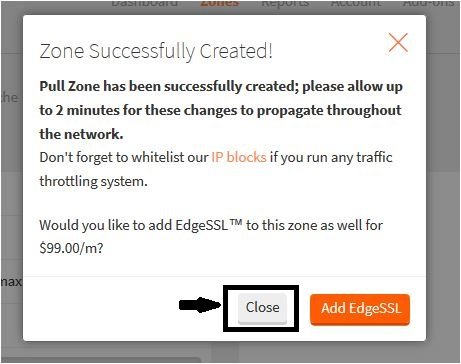
As you click the close button, you’ll find a URL which is called ‘CDN URL’. Which looks like ‘beginnersblog.p4b3is5ae4kh.maxcdn-edge.com’. Copy that URL and go to the next configuration given below
4th step – (Create a custom domain in MAXCDN)
Ok, you’ve successfully created pull zones. Now it’s time to create a custom domain. For building, go to settings and create a custom domain like this. You can create up to 7. But I think four custom URLs are enough.
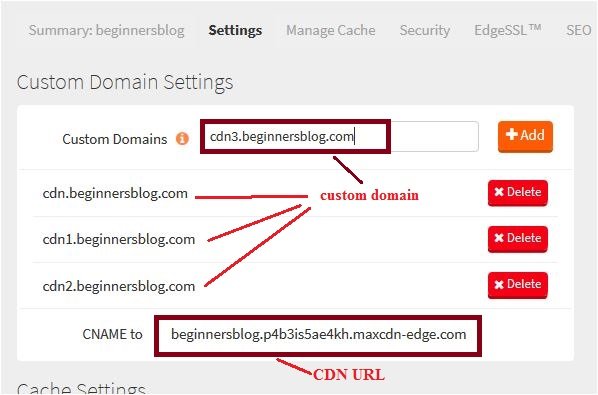
It is not mandatory to have a subdomain like ‘cdn’. You can put any other subdomain like file, site, and blog, etc.
If you choose ‘cdn’ as a subdomain, your custom domain looks like this
- cdn.yourdomain.com
- cdn1.yourdomain.com
- cdn2.yourdomain.com
- cdn3.yourdomain.com
5th step – (Add CNAME records for MAXCDN from cPanel)
Here you need to point your custom domain to the CDN URL. Let’s see how you can do that.
My site is on Hostgator. If you’re on different hosting, then don’t worry every hosting cPanel has very similar settings.
First of all, login to cPanel > Domain > simple zone editor
As you enter into the simple Zone editor, You’re asked to choose a domain under which you want to add CNAME records.
Now here you’re asked for two things.
- Name: Put your custom domain (ex: cdn.mechaplanet.org) that you’ve created earlier.
- CNAME: put your CDN URL which looks like ‘beginnersblog.p4b3is5ae4kh.maxcdn-edge.com.’
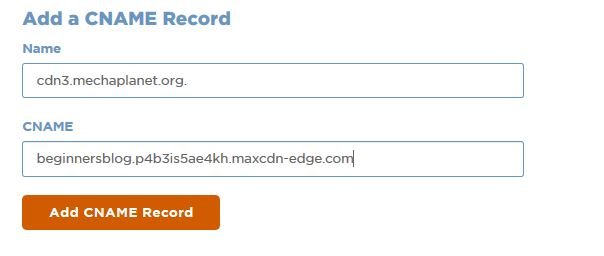
Repeat this process four times to create four CNAME records. Your CNAME records look like this.

6th step – (Download the WP fastest cache plugin)
Go to the WordPress dashboard and install this plugin.
7th step – (Set up MAXCDN with WordPress using WP fastest cache)
You’ve finished your initial configuration. Now you need to connect MAXCDN with WordPress. First thing first, open WordPress dashboard > WP fastest cache plugin
As you click the plugin icon, you’re asked to make the ideal WP fastest cache plugin settings. Tick the following options.

If you’re using a free version of this plugin. Then you’re not allowed to tick some of the options. Leave them as it is.
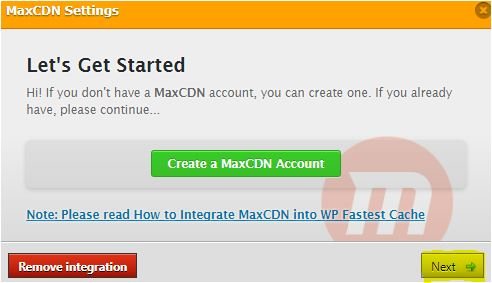
Next, click the CDN button.

And select ‘CDN by MAXCDN.’ Here you’re asked for creating a MAXCDN account. You’ve already created one so just skip that and click the ‘next’ button.
The next box asks you for two things the first one is CDN URL and the second one is ‘origin URL’. CDN URL is required to deliver your content with MAXCDN and origin URL is necessary to pull the original content to serve the browser.

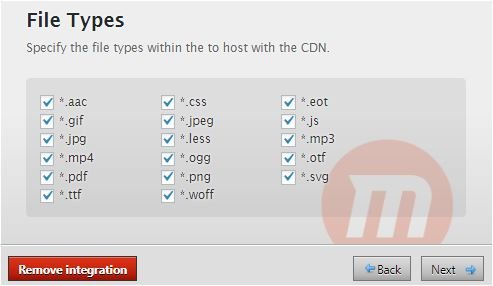
After putting both the URLs, click the next button. Specify the file-hosting with MAXCDN and clicking the next button.
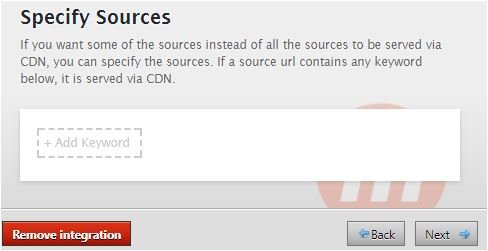
Finally, you’re asked for specifying the sources. Keep it empty.
You’re all set. Just click the Finish button, and you’ve successfully set up the MAXCDN with WordPress using WP fastest cache plugin. Now MAXCDN can deliver your static files to the end-users.
Attention: –
Conclusion: –
If someone asks me to choose the best and cheap CDN service, then I’ll select MAXCDN because it serves me well.
It helps me to increase my loading speed by 180%. Earlier it was 7 seconds, but now it is 1 to 3 seconds. It also helps me to improve my SEO and search rankings.
I hope you would enjoy reading this guide. If you like this article, don’t forget to share it on Facebook, Twitter, LinkedIn, and Reddit.
If you’ve any queries, feel free to ask.
How was your experience while using MAXCDN? Share your thoughts.


3 thoughts on “How To Setup MAXCDN With WordPress Using WP Fastest Cache Plugin”
Pingback: How To Setup MAXCDN With WordPress Using WP Fastest Cache Plugin | WordPress Plugin News
A great article shailesh! Really right on money! I just wanna ask that ehat is POP SERVERS
Point of presence – where CDN servers are located