

Elementor is one of the best tools for building beautiful websites. It offers a lot of features that allow you to build anything from a simple blog to complex eCommerce sites in minutes.
If you’re planning to start a blog or website this year, but know nothing about coding, then this post is right up your alley.
This guide will teach you everything you need to know about how to create a website with Elementor pro from scratch.
I’ll start off by showing you how to install Elementor and set up your site. Then I’ll move on to explain how to add and design elements like headers, footers, menus, widgets, sliders, galleries, contact forms, and much more.
Finally, I’ll take a look at how to customize each element and make them match your brand colors and style.
By the end of this post, you’ll learn everything about how to get started with Elementor pro, learn to create a website, and start a side hustle that can make you $1000 easily.
So stay tuned till the end…
So, let me share the exact steps you need to take to create a professional website from scratch and make money with Elementor.
First Step: – Learn The Basics and Get Comfortable
A Quick Elementor Tutorial:
Website at a glance – A website is a collection of web pages that are linked together to form a single, cohesive unit. A common type of website shares information about a business or organization. You can create a website using any number of different CMS software like WordPress and a page builder like Elementor.
A website has the following sections/elements/templates
- Header: This section contains your logo, navigation links, and other important branding elements. It also includes the search bar if you have one.
- Footer: This is usually a place for copyright information, contact info, and other miscellaneous items like quick links.
- Homepage: A homepage contains all the basic information about your company. It may include a brief description of what you do, about our product/service, some pictures, and maybe even a video.
- Single post: It’s a post-type template that decides how each and every post on a website or blog is going to be presented to visitors.
- Archive page: An archive page displays posts from a specific category in chronological order.
- Page: A page type is similar to a single post but it allows more flexibility in terms of layout and formatting. Pages can contain multiple posts.
- Error 404 page: If there’s an error with a particular page (like a broken link), this will display instead of the normal content.
- Single Product Page: Similar to a Single Post, except it shows only one product at a time.
- Product Archive: Shows all products in a certain category.
- Search Result: It displays results based on a keyword search.
Now I’m going to teach you how to use Elementor to create a fully-functional website/blog.
To get started, first set up your own website with Elementor. For this, you need a Hosting, Domain, and Elementor pro plugin.
However, you can try the Elementor Cloud website service. It cost you only $100 a year. Or you can buy a separate hosting from Hostinger or Bluehost and Elementor Pro plugin from Elementor’s Official Page.
Once you have this, you just need a custom domain which you can buy from Godaddy or Namecheap for $10 – $20 bucks.
So, in total, you need $120 to set up your website.
PRO TIP – I Recommend you buy the Elementor Advance plan so that you can add 3 websites just for $100/yr. Because you can manage 2 more domains under the same license.
With this, you can learn how to set up a website and design it with Elementor.
A simple checklist to set up your website with Elementor
- Buy a reliable domain & hosting – If you buy the hosting from Hostinger, you can get a free domain for 1 year. (If you follow the first step, you can skip the second step. )
- Remember, in case, you buy a domain separately, you need to point the domain to your hosting server.
- Install WordPress on your hosting server. (Most hosting comes with 1-click installation, you just need to add admin details to complete the installation process.)
- Install A Theme: I personally recommend Hello by Elementor and Astra. (Here is a list of WordPress themes that are compatible with Elementor. )
- Install Elementor: You need to install the free version of Elementor from the WordPress plugin library.
- Buy Elementor pro: First, go to Elementor, pick a pricing plan, add your credit details, make a purchase, Download the Elementor pro plugin’s ZIP file to your computer, head to WordPress Dashboard, go to Plugins option, and upload this ZIP file. (NOTE: You need to install and activate both Elmentor & Elementor pro.)
- Once uploaded, activate the plugin and you are good to go with the design Process.
Now, you’re almost ready to design a professional website… For this let’s move to the second step.
Second Step: Design with Elementor
Okay, so far you have learned the basic building blocks of website designing. Now it’s time to run through different features of Elementor and learn how to design different-2 sections, templates, and elements.
So, let’s begin…
How to create a Header with Elementor Pro
First, log in to your WordPress admin panel. From the sidebar, head to Templates > Theme Builder )

It takes you to the main theme builder page, where you can start customizing every part of your site.
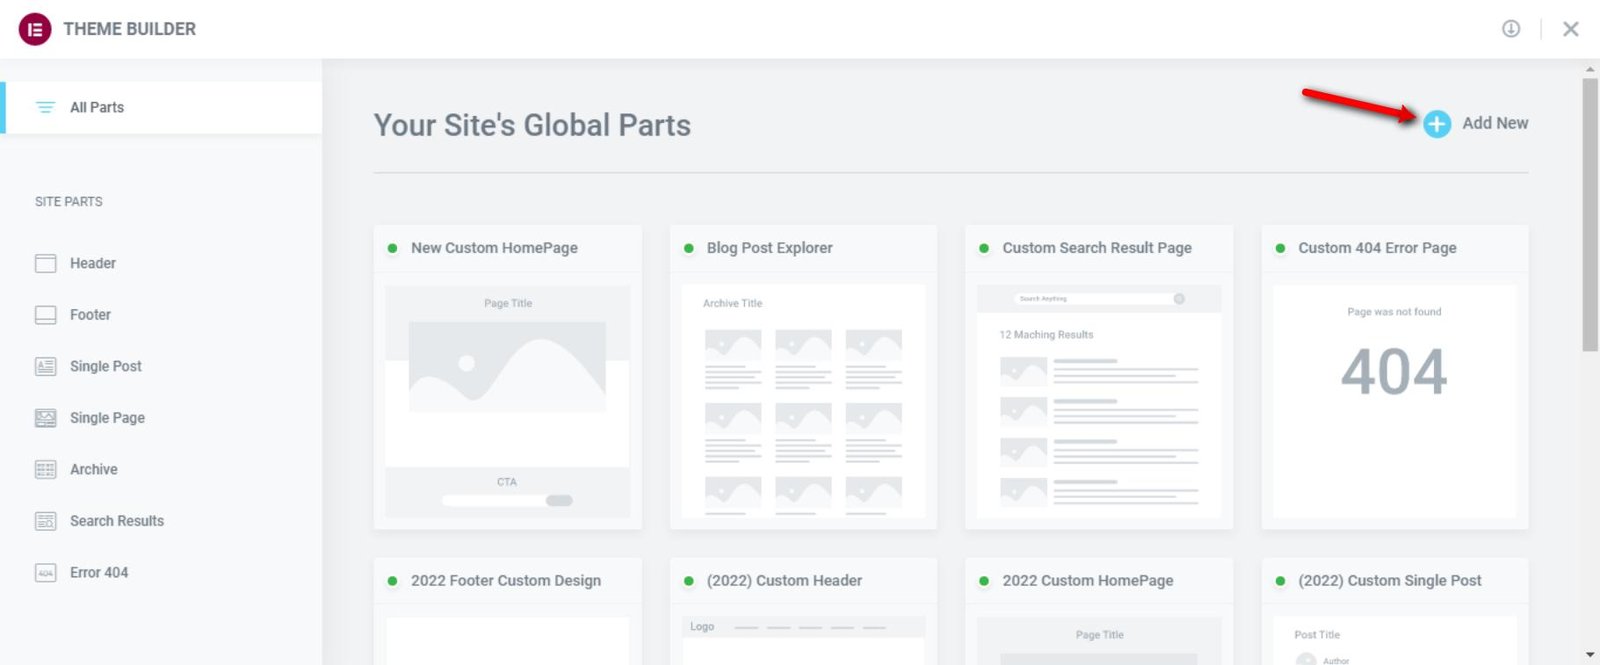
Now in order to design your header, you need to click the header option.

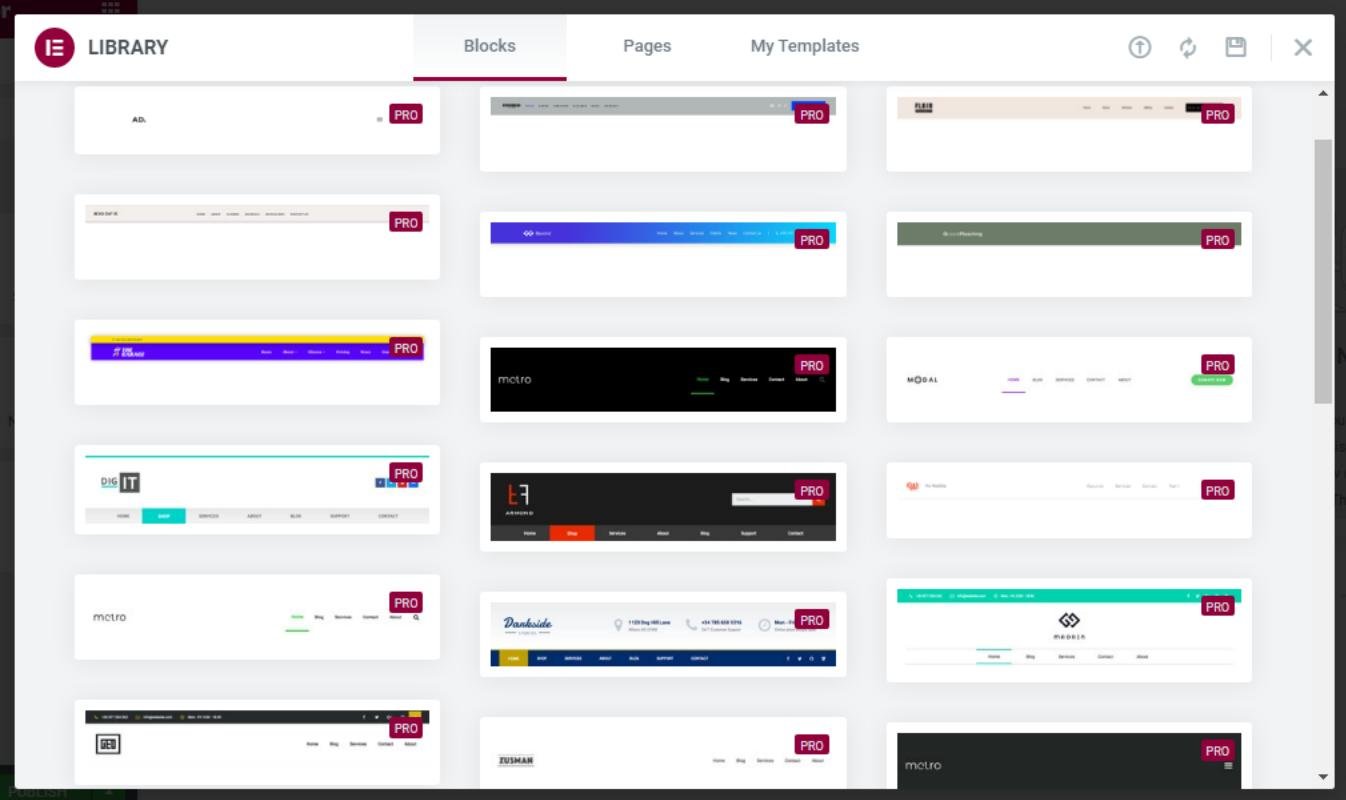
A popup shows you the template library, from there you can insert pro header templates to get started. You can even create one from scratch, it’s up to you.
For now, I’m inserting one from the Elementor header template library.
You can change the logo, BACKGROUND, color, size, and layout of the header in just a matter of minutes. Elementor is loaded with tons of header customization options. So, let’s start with the LOGO…
See how to change the header logo with Elementor.
![]()
You can go to the style option and change the size, add some transparency, and add a border to your logo.

How to add menu nav bar to header with Elementor pro
First, click the grid icon at the top right corner. And drag the Nav Menu into the column or section you want.

Here you see all options to customize the Nav menu to make it look professional and responsive.

How do I add a search button in WordPress Elementor?
Most commonly, bloggers use a search icon in the header area to allow users to search for stuff right from the top. With Elementor, you can do this in just a few clicks.
For this, first, head to the Widget area and search for “search form” and drag it into the area you want.
Once you have it at your desired location, you can customize it to make it match your branding. You can design your footer in the same way.
![]()
NOTE: Make sure you enable the Responsive mode to see whether or not your design is compatible with all devices. You can do it by clicking a little device icon at the bottom-left corner. It displays a bar at the top of the screen. With this, you can inspect your template for mobile, desktop, and tablet to make it pixel-perfect.

Something like this…
Note: Make sure you always save the changes before switching to the next mode. Overwise, you’re going to lose the design settings for the mobile or tablet version.
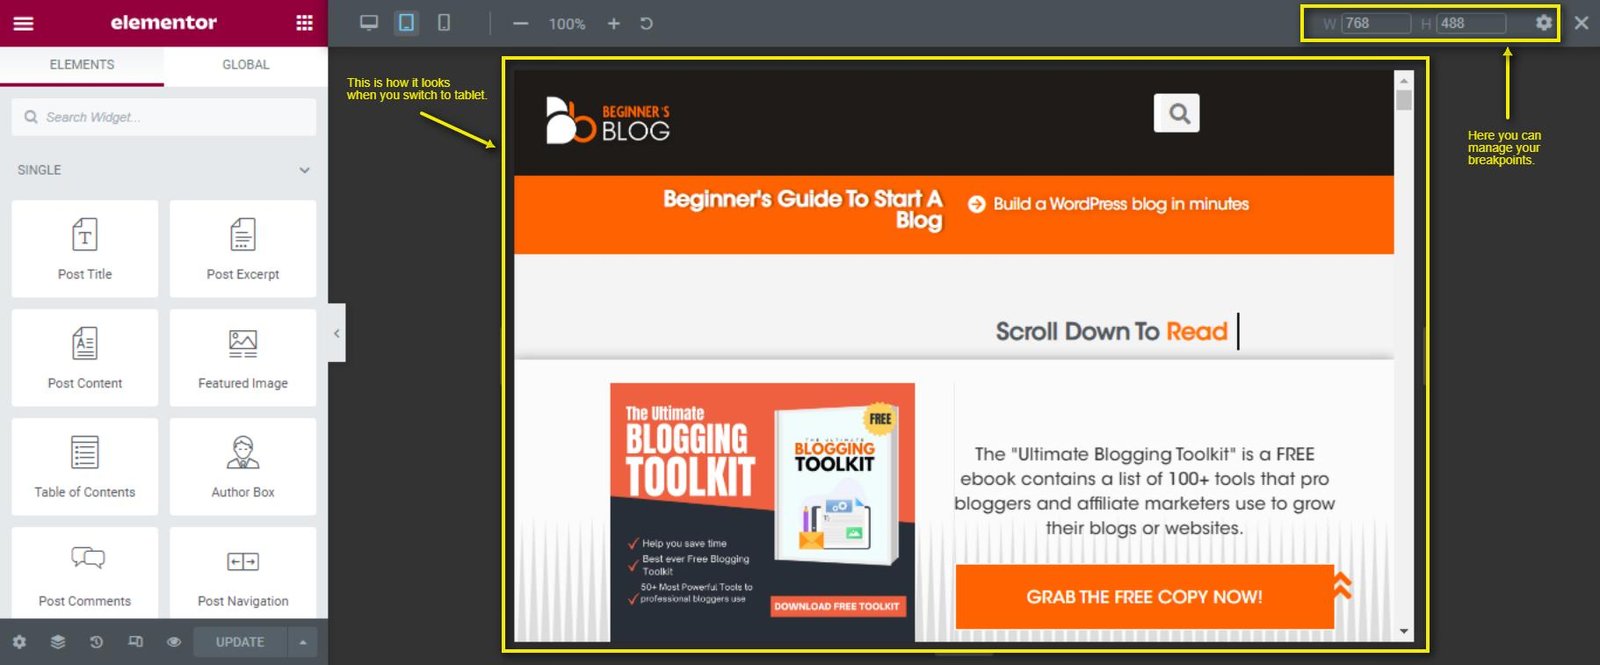
Note: Make sure you always save the changes you make before switching to the next mode. Overwise, you’re going to lose the design settings for mobile or tablet versions.

Now let’s talk about how to create the “single post type” template with Elementor Pro.
How to create Single Post with Elementor Pro
A single post template includes…
- Post Title: Elementor has a “post title” widget to display the title of a post. Just drag and drop it anywhere.
- Post meta data: Just drag and drop the “Post info” widget to display the author name, date, etc.
- Sidebar: A post template usually has two columns. One is for post content and the second one is for displaying sidebar widgets. You can do this by clicking the plus icon on the canvas and choosing the number of columns you need.
- Content area: Elementor has a “post content” widget to display your posts.
- Thumbnail: Use the “Featured image” widget to display the post thumbnail.
- Related post section: Use the “Posts” widget. From there go to the Query option, and apply terms by categories & tags to show the related posts.
- Author box: Just drag and drop the “Author Box” widget from the left sidebar.
- Social Share buttons: Search for the “share button” widget in the Elementor widget library and insert it anywhere in your post template to display share buttons.
- Comment area: You can add a “post comments” widget to display comments.
Once you incorporate all these sections, elements, and widgets, and place them at their desired location, you’ll have a fully-functional post template in just 30 minutes. (Looks something like this… however, you can customize the layout, color, and style to make it look more personal and appealing to your brand).
This is what a “single post template” look like…
NOTE: this post template doesn’t include a sidebar.

Before publishing, make sure you set the display condition to assign the post template to all posts.

That’s it!
In the same way, you can create Homepage, Archive page, 404 page, and About me page with Elementor Pro. It has countless widgets and built-in elements that you can simply drag and drop on a page and turn a blank Elementor canvas into a beautiful WordPress website in less than an hour.
Lastly, I would like to teach you how you can design a popup, and newsletter form in minutes with Elementor pro.
Helpful Resource: How To Use Elementor in WordPress: 8 Major Use Cases
How to Create a Popup with Elementor Pro
To create a Popup, first head to Templates>>Popups from the left-sidebar of the WordPress admin area.
Then, click the “add new” button from the top, name your popup and click the “create template button”.

It shows you a built-in popup template library that you can use or you can even design one from scratch.
For now, I’m going to insert one from the library. So here I go…

You can pretty much customize each and every element of the popup.

And also add the button to submit an event. This is how you can allow people to subscribe to your newsletter.
For this, you need to click the form field on the popup > Go to actions after submitting action>> click plus icon >> add your desired email service and connect API.
Also, change the color, style, and look of your popup. And it’s done!
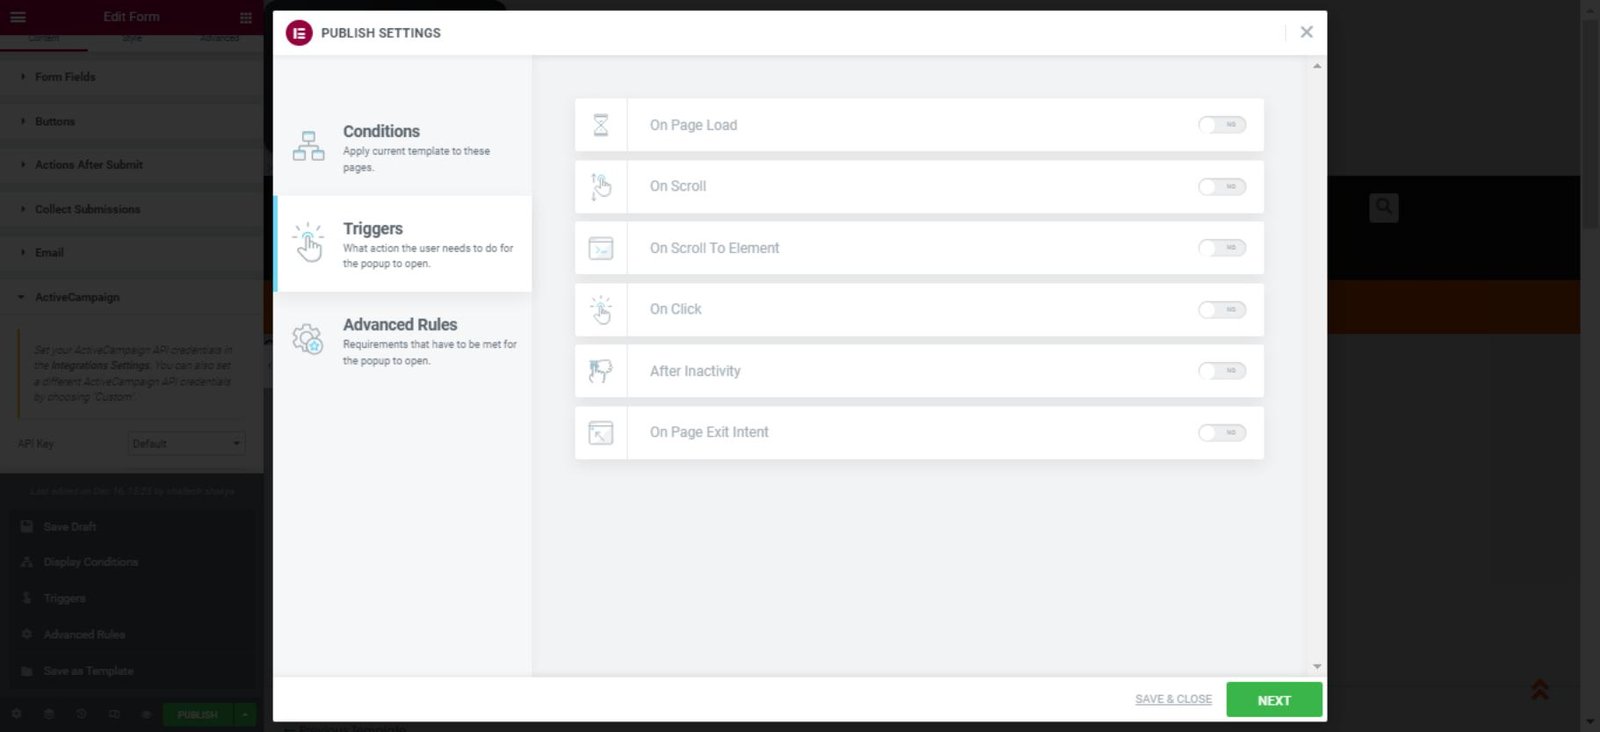
Now, you just need to set display conditions and triggers to make it fully functional. With display conditions, you can decide on which post you want to show the popups. And triggers are the actions/conditions users need to take or fulfill to display the popup.
For example, you can trigger a popup when the user scrolls through 50% of your post. Or you can even trigger a popup after a particular time interval.
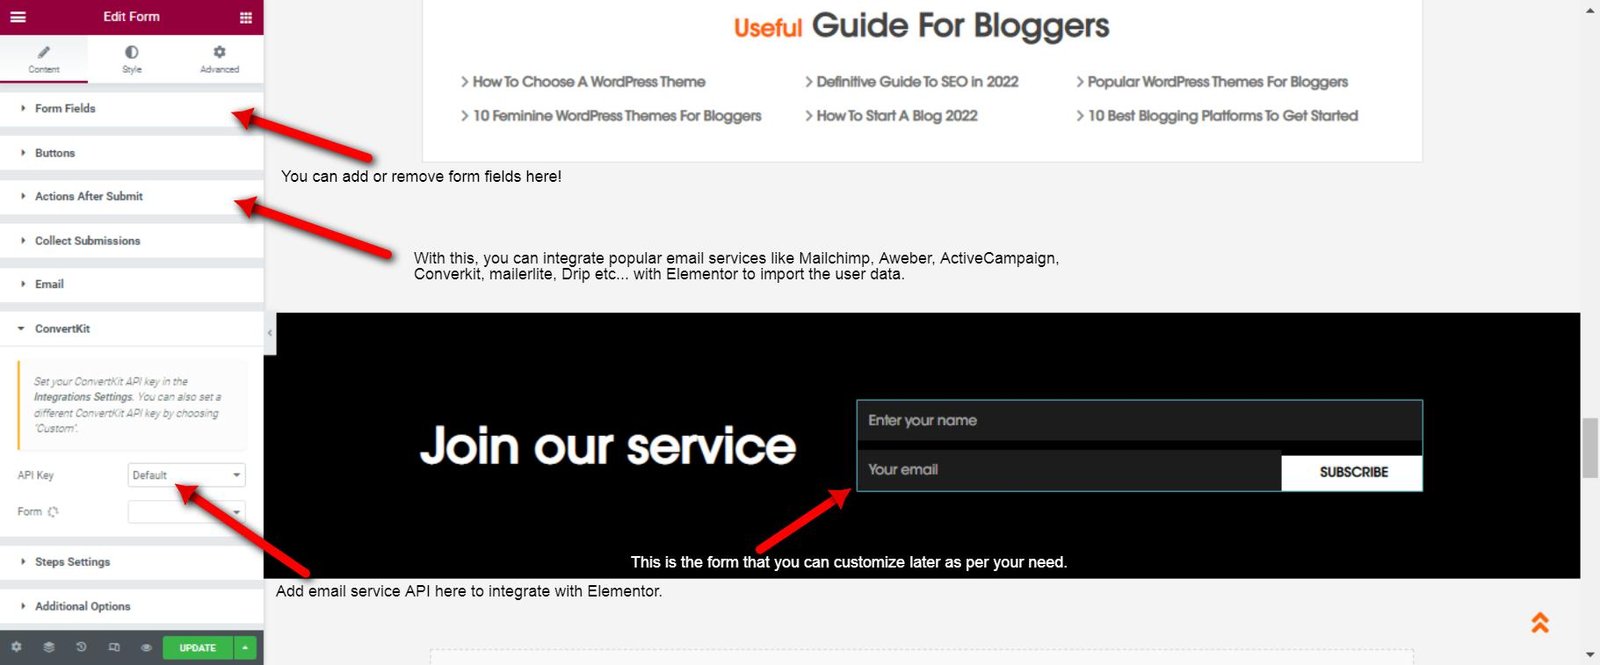
How to Create a Newsletter with Elementor Pro
A newsletter is a tool/form used by bloggers, businesses, and organizations to share relevant and valuable information with their subscribers.
To build a form, first, you need to decide where you want to show your newsletter. Mostly, bloggers install newsletters within in posts, homepage, and about me pages.
If you want a newsletter on your homepage, then first you need to go to Templates >> Saved templates and then find your homepage template.
Once you’ve found it, just click ‘Edit with Elementor’ and you are ready to start creating a newsletter. You can start by inserting a simple subscribe block from the Elementor library.

After that, you can add important form fields like first name, email address, submit button, and a compelling heading.
Lastly, you need to integrate your email service with Elementor. That’s it, your newsletter is ready to go live.
Third Step: Make Money With Elementor
Now it’s time to share the side hustle that you can start with Elementor pro. And make at least $1000 per month.
According to Elementor, there are 3 ways to make money…
- You can also join the Elementor Affiliate program to earn 50% recurring affiliate commissions. It means, if you get 10 people to pay for the basic plan of Elementor which is $59/yr, you are going to make $29.50 from an active customer every single year. So, if you make 100 people buy Elementor, you can make $2950 per year.
- By selling templates and add-ons from your own website using Freemius. Or offer WordPress website development services on Upwork, Fiverr, etc.
- By selling add-ons on CodeCanyon, and premium templates on ThemeForest.
You can go with one of the above methods to start your side hustle with Elementor pro. But for the sake of this article, I’ll talk about the first two methods only. Because the third method requires coding skills and it’s not part of my discussion.
So let’s begin…
Let’s first talk about “The Elementor affiliate program”, it’s the easiest way to make money recommending Elementor pro to new bloggers, and small local businesses.
Steps To Follow :
- First thing first, Join the Elementor Affiliate Program. After heading over to the page, make sure you fill out the form correctly. Once you submit the form, you’ll need to wait 2-3 days to see if you’re accepted as an Elementor affiliate.
- Next, log in to your affiliate account and go to marketing tools, and grab your unique affiliate link and assets.
- Now, you need to make a promotional strategy to promote this link.
- For this, you can target new bloggers and small local businesses on different -2 social media platforms. You can create content for bloggers to use Elementor pro.
- You can try Pinterest, Reddit, and Medium to begin with.
- That’s it!
With the Elementor Affiliate program, you are going to make a 50% recurring commission. It means, if you get one sale, you are going to going to make a 50% commission until your referral decides to keep the subscription active.
Now let’s talk about the second method. It’s a kind of freelance business that you can start from home. You just need a little investment to get started.
Steps To Follow
-
- First, you need to get the Elementor pro plugin, I recommend you buy the Elementor Advance plan for $100/year as it allows you to add 3 websites. Once you have your first 2 paying clients, you can upgrade to an Agency plan to handle up to 1000 websites.
- Once you have the Elementor pro, master basic to advance skills. It won’t take you any longer if you’re already familiar with Website structure and know the basics of Elementor. You can even watch a few Tutorials to learn how to create a professional website with Elementor.
- Next, you need to set your pricing for your service – Evaluate your true potential, research the market, and set competitive pricing plans.
- Get your first client – You can contact local businesses to build a service page for their business, or you can create a gig on Fiverr or Upwork and find potential clients on Reddit and Facebook groups.
- Once you have your first client, you need to deliver the service as promised – Use the skills you learned from previous steps and try to deliver your service. You can over-deliver your services for the first few clients to get positive feedback.
- Once you have feedback, you can easily build your portfolio.
- Lastly, you can tweak pricing, and promotion strategies to scale your business.
- That’s it!
How much money you can make with Elementor
In my opinion, you can make $1000 per month if you keep getting 3 – 5 clients each month. However, you can add one recurring pricing plan to generate recurring income each month and make over $1500 to $3000 per month.
NOTE: No matter which method you choose, you need marketing skills to grow your business.
So, this is how you can use Elementor pro to create stunning websites for you and your clients and make money with Elementor as a no-code developer.
Helpful Resource: Elementor Review: I Spent $99 and This Is What I Get?
Conclusion:
Elementor Pro is a complete website solution for bloggers and online businesses. If you have a knack for making money with Elementor, you can try one of three methods from this article, and build an online side hustle from nowhere to bring an additional $1000 each and every month.
I hope this post helps you discover something new that can add some value to your living? If so, please share it with your friends and colleagues on social media platforms.