
In this google sites tutorial series, I will teach you how to verify Google Sites with the search console.
As you know, Google sites are now booming. And why not? It’s become one of the best platforms to create a free blog/landing page for many bloggers like me and you.
It became even more popular since Google rebuilt ‘Google sites’ in 2016. They added exclusive features to enhance page structure.
Compared to classic Google sites, new google sites are easy to design and come with an intuitive user interface. On top of all, these are mobile-friendly and flexible.
Because of these features, more and more web admins are showing their interest in New Google Sites. When I first learned about Google Sites, I couldn’t stop myself to create a blog with Google site.
However, you can create a simple free blog/landing page without programming skills, but when it comes to servers, Google sites are technically less flexible.
Google controls the server-side of your site. As a result, you can’t upload files, custom code, themes/templates to your root directory, excepting features that google allows you to insert on a single page.
And one of those problems is how to verify Google site domain property ownership in Google search console as it seems impossible to add an HTML tag within the <head> section of your Google site.
And that’s the main reason why you are here…
Don’t worry, I’ve got you covered here!
For simplicity, I’ve broken down the entire process into three simple steps
- Set-up Google Analytics
- Add Google Analytics Tracking Code to your Google site
- Verify Your Google Site Ownership with Search Console
So let’s begin…
Set-Up Google Analytics In the process of verifying google site ownership, your first move is to connect your Google site with analytics.
For this, first head over to Google analytics. (Or log in to your existing analytics account)
Note: If you don’t want to mess up with your existing account, you can sign up with a new Gmail to create a new Google Analytics account.
Once you are in, click Admin in the bottom-left corner of the sidebar.

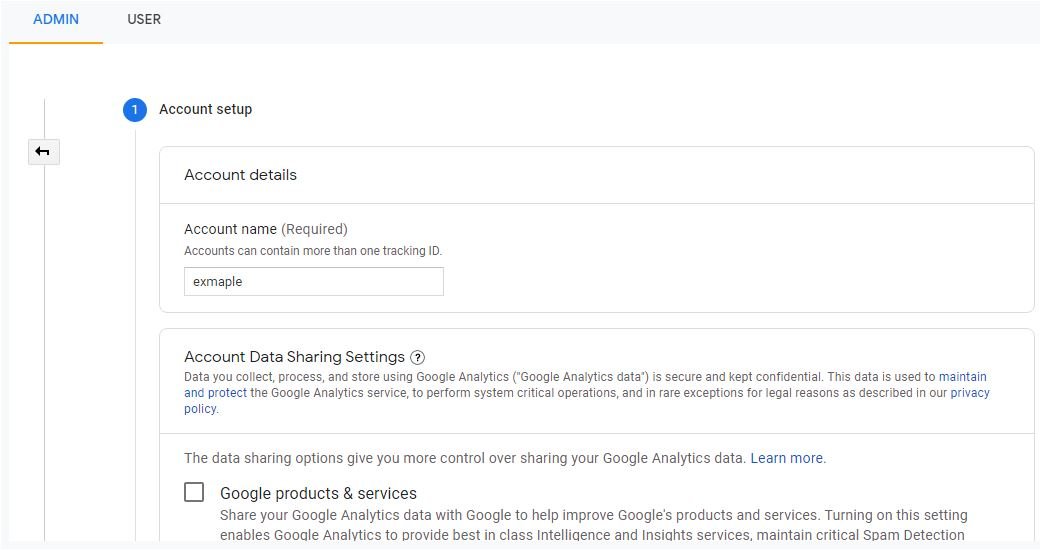
Next, click the ‘Create Account’ button.
Upon clicking, you see a 3-step process. The first one is Account Setup, where you need to give Account name and data sharing options to choose from.
The second step is ‘Property Setup’. Here, you need to name your property (Usually your Google site’s name), reporting time zone and currency.

Once you set up everything correctly, click ‘Show advanced options.

And from there, switch on the toggle button to create a Universal Analytics property. Add your domain name (ex: site.google.com/view/example) and choose the last option (Create a Universal Analytics property only) if you don’t want Google Analytics 4.
The final step is ‘About your business’; here, you need to select your business category business size and intend to use Google Analytics with your business.

Now, click the ‘Create‘ button and accept the Google Analytics terms of service agreement.
Congratulations, you are done with the Google Analytics account setup.
Now, let’s move to the next step…
2. Add Google Analytics Tracking ID to Your Google Site
Well, it’s the easy one and takes less than a minute to configure as you have already set up your Google Analytics account.
For this, first, copy your Google Analytics tracking ID. It looks something like this – UA-XXXXXXXXX-X.
Now, go to your Google site setting… (As you hover over the header section, a gear icon appears.)
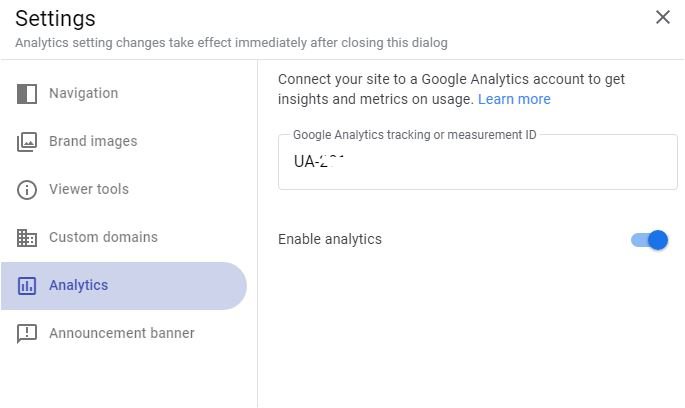
After clicking this gear icon, head to ‘Analytics‘ and paste tracking ID here, and it’s done…
Finally, the most crucial part that plays an essential role in verifying your google site ownership with search console is done.
3. Verify Your Google Site Ownership with Search Console
First of all, open Google analytics > admin > Property > Product linking
It shows you all Google products that you can link with Analytics. Now scroll down and look for ‘Search Console’.
Once you find this, click the ‘Link search console’ button, and it takes you to the google search console setting page.

Then, click the ‘ADD‘ link next to none. It redirects you to the search console page that asks you to add a property.

As you add your Google site property, it shows you the verification options. You need to choose ‘Google analytics’ and click the “Verify” button.

In my case, the ownership verification is failed because of the example domain. The domain never existed; I have just taken it as an example for this tutorial. But in your case, it will be verified.

So, you have successfully verified the ownership of the Google site with the Google search console.
I hope this tutorial will help you verify the Google site ownership with the search console.
If you find it helpful, leave a comment. I’ll be happier to respond to you. You can even share it on social media platforms to help others.