
In this guide, you will learn how to redirect HTTP to HTTPS on your WordPress site. For your convenience, I will explain each step and answer the questions you are about to ask. So stay with me till the end.
Let’s get started…
1. Contact Your Hosting Provider
This is the easiest way to implement HTTPS. All you have to do is contact your hosting provider.
Almost every popular hosting company offers SSL. You can either buy a premium SSL or get a free SSL from your hosting.
Many hosting companies like Bluehost, Hostgator, and Dreamhost offer you a free let’s encrypt SSL certificate.
You can start a live conversation with customer support and ask them to install free SSL on your server.
Once they install SSL on your server, you can ask them to change the site URL, complete additional steps such as 301 redirections and testing.
Everything is done from the main side of your website. The remaining things such as updating the sitemap, changing the external linking, and adding a new property to the search console will be done manually.
You have successfully redirected HTTP to HTTPS.
Note: If you are running your online e-commerce business, do not use free SSL.
This is that you can redirect HTTP to HTTPS without too many headaches.
Another way to go from HTTP to HTTPS is by “following these steps”
Redirect HTTP To HTTPS In WordPress: 11 Easy Steps To Follow [Advanced Guide]
QUESTIONS
In this section, you’ll get the answers to the questions.
These are the questions that you might ask before or after redirecting HTTP to HTTPS.
Let’s begin…
1. Should I redirect HTTP to HTTPS?
The quick answer is YES.
In fact, Google encourages webmasters to move to the secure HTTPS protocol.
HTTPS prevents abuse of your site. This protects the privacy and security of your readers. “
Apart from this, it also helps in improving your search visibility and ranking.
Now I don’t think you should make more excuses for not using HTTPS.
2. What do I need to know before moving from HTTP to HTTPS?
The first thing you should know is what type of SSL should you buy? ‘
As I already told you, it all depends on the type of your site.
If you are a blogger like me, you better use ‘domain verification SSL’. And you can get this SSL type for free from popular hosting companies.
But if you are running a business or e-commerce website, it is better that you go with the highly secure SSL available on DigiCert, COMODO, or GlobalSign.
Note: – BlogSpot users do not require any HTTPS. There is an option within the setting where they can enable the HTTPS protocol for free.
3. IS HTTPS a total solution to website security?
Many novice bloggers think HTTPS is a total security solution, but they are wrong.
Because HTTPS only encrypts your data communication between browser and website. This makes online transactions risk-free and protects buyers from any data breaches.
But it does not protect your site from malicious and DDOS attacks. Your website is still at risk of being hacked.
So do not put your blog or website at risk. I suggest that you use a website security service to protect your database and web server.
As a WordPress user, you can go with Sukuri, Wordfence, or Sitelock to protect your site.
This means you need both HTTPS and website security services for total security.
Also, read: –
- How to remove malware from your WordPress site
- How to configure Sitelock security with your WordPress website.
4. How much traffic I will lose after moving from HTTP to HTTPS?
However, Google confirms that HTTPS migration does not affect traffic. But it brings traffic fluctuations.
And you may lose 30 to 70% of traffic temporarily. This means that if you are getting 100 visitors every day, then after migration, you will get only 30 to 70 visitors and this will continue for 2-3 months.
But you do not have to worry about traffic because if you have followed the right direction you will get it back as soon as possible.
See my report below… (Traffic loss)
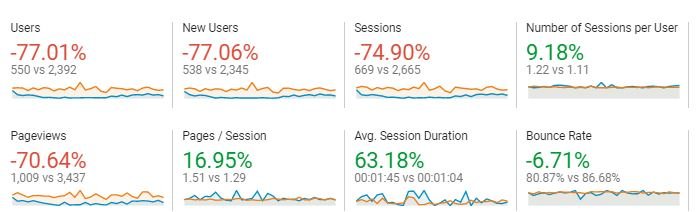
I agree that HTTP to HTTPS redirection still affects traffic, but at the same time, it improves bounce rates and rankings.
5. What kind of errors can I get while moving from HTTP to HTTP in WordPress?
The most common error is the ‘mixed content error’ that you may encounter while migrating.
Mixed content is when your assets/resources on pages load over HTTP instead of HTTPS.
It occurs because of improper HTTPS redirection. And in this case, some of your page resources (like media, scripts, or CSS) are not redirected to HTTPS properly.
However, the ‘really simple SSL’ plugin fixes this error automatically. But if you’re still getting the error, then no problem you can fix it manually.
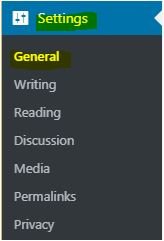
For fixing, first, check your WordPress Address and Site Address. You can find these options in General under settings.
If both addresses are correct, then it’s time to replace all old HTTP URLs in your WordPress database with HTTPS.
You can use the “better search replace plugin” to quickly change URLs.
First, install and activate the plugin.
After activating, open the plugin.
Here you’re asked for two things. The first one is ‘search for’ and the second is ‘replace with’.
Enter the old URL (http://yourdomain.com) in the ‘search for’ field.
Next, enter ‘https://yourdomain.com’ in the ‘replace with’ field. Now click the ‘run a search/replace’ button and you’re all set.
The plugin has successfully replaced all HTTP with HTTPS.
6. Check Robots.txt File
The Robots.txt file plays an important role in instructing Google bots. One simple mistake can block your site to be crawled.
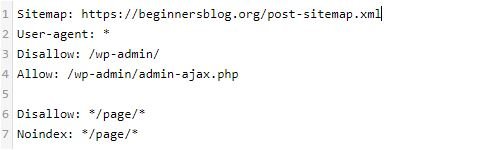
You can add your new sitemap URL to the robot.txt file so that Google bots can know the exact location of your new sitemap.
Sitemap: https://beginnersblog.org/post-sitemap.xml
Make sure you check your sitemap URL first and then add it to the robots.txt file as your sitemap will be different from mine.
Sitemap: https://your-sitemap-url/sitemap.xml
Let’s have a look at my robots.txt file…
I have answered 6 questions related to the HTTPS migration process. If you have further questions, you can leave a comment and I will do my best to give you a solution.
Now let’s get started…
STEP 1. Take a full backup of your existing website
The first step is to take a complete backup of your website. However, it will not play any role in the migration process but it is necessary to have a backup.
Because it helps to bring your site back if something goes wrong. You can backup from cPanel or using the WordPress plugin.
I use the ‘UpdateraftPlus Backup plugin’. With this, you can backup manually anytime.
Or you can go with a premium version for auto backup.
To take a backup, go to the UpdaterafPlus icon at the top header of the WordPress dashboard.

And click on the / Backups / Restore ‘option. After that, you will be redirected to the main backup dashboard.
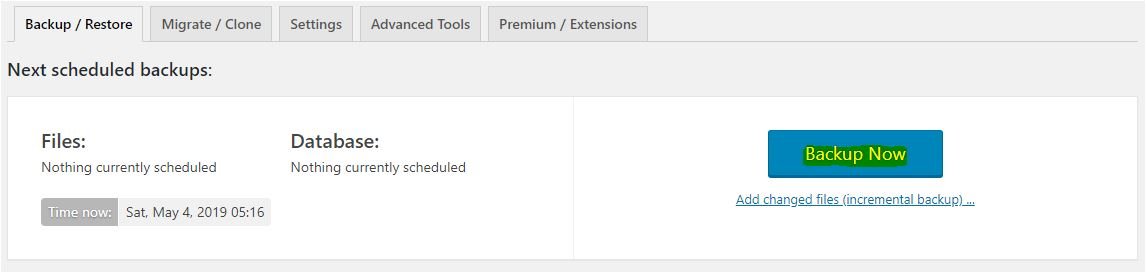
Now, press the ‘Backup Now’ button. As you click it, the plugin starts collecting the data from your server and create separate zip files.
Once the process is finished, you’ll see five separate files. Click each of these files and download them to your computer.
- Database file
- Plugins
- Themes
- Uploads
- Others
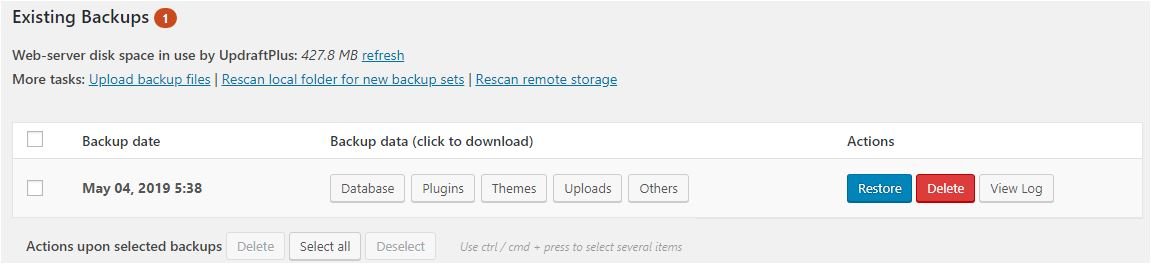
Note: Make sure you don’t click the ‘delete files from your web server’ button.


Finally, you have taken the full backup of your website and now you can move to the next step…
STEP 2: Purchase an SSL certificate and install it on your server
To add an SSL certificate, first of all, you need to buy one.
There are many third-party SSL provider companies where you can purchase SSL at very reasonable prices.
It costs you $ 30 to $ 200 per year.
But before you buy it, make sure you choose a suitable SSL for your website.
How do you know which SSL is best for your website?
It depends on what kind of website you are running. I mean this is an informative blog or e-commerce website.
If you are running an informational blog, then the Domain Verification SSL type is the best option for you.
But if you have an e-commerce business website that deals with online transactions, then you need a highly secure SSL type.
In this case, you can go with COMODO instant SSL pro, Geo-Trust, or Global-Sign SSL certificate. These are reliable SSL and protect the buyer from all types of transaction breeches.
For bloggers, domain verification SSL is the best option, as it is cheaper than other SSL types.
You can get one for free from your hosting provider. In fact, I am also using Let’s Encrypt Free SSL.
And the good thing is that it is now available on all popular hosting companies…
- HostGator
- BlueHost
- DreamHost
- Kinsta
- WP Engine
- A2 Hosting
- FlyWheel
- SiteGround
However, you can purchase SSL from your hosting provider. I am using HostGator and it offers both free and premium SSL.
Just go to cPanel and buy SSL from there. You can also buy from third-party SSL provider companies such as DigiCert, COMODO, or GlobalSign.
Once you purchase SSL, it is time to ask the hosting provider to install SSL on your server.
STEP. 3: Install ‘really simple SSL’ plugin
Now that you have installed SSL on your server, the time has come to integrate SSL into your WordPress website.
Really Simple SSL is a free plugin that helps you configure SSL in just one click.
This plugin automatically detects SSL and fixes mixed content issues. If you are not having any problems, you are good to go
This replaces all HTTP with HTTPS, so you do not need to change them manually.
Next, you can test your site to see if it is redirected to HTTPS.
Once this is completed, you are ready to move on to the next step.
Step 4: Change both site address and WordPress address
However, the really simple SSL plugin automatically changes both the site address and the WordPress address.
But if you are getting an error, make sure you check these options in the general settings and replace HTTP with HTTPS.
See the screenshots below…

Step 5: Add 301 Redirection
You don’t want to lose your ranking, do you?
Whenever you make major changes to your website, you get to see traffic fluctuations.
And if you redirect HTTP to HTTPS then it also affects your blog traffic.
And if you don’t do 301 redirections, you will keep losing traffic. Because Google considers HTTPS a separate entity.
301 redirection tells Google that the corresponding URL is permanently redirected to HTTPS. And all the old content has now been moved to the new HTTPS version.
Remember, even if you redirect 301, you will still see traffic fluctuations. But after a few days, Google starts re-indexing your site and you will get your traffic back.
Now the question comes … how do you add 301 redirects?
Being a WordPress user, you can use the WordPress plugin. But I recommend you use the .htaccess file to add 301 redirections.
Step by step process to add 301 redirection to your WordPress site using a .htaccess file
- First, log in to your hosting cPanel.
- Go to file manager
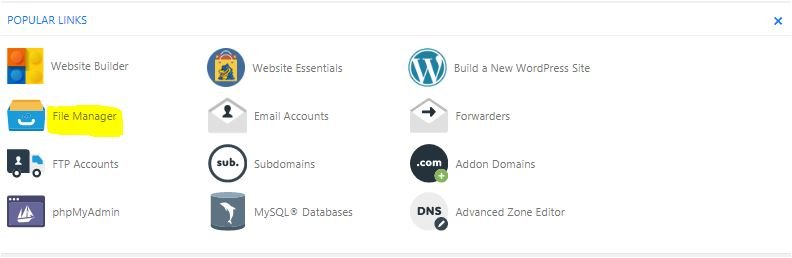
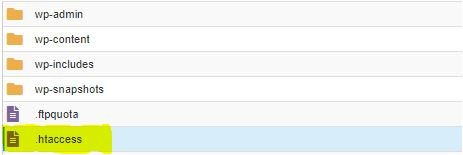
- Choose your directory and enable the ‘show hidden files (dotfiles)’ option.

- Once you get the .htaccess file, paste the code given below on top of the file.
<IfModule mod_rewrite.c>
RewriteEngine On
RewriteCond %{HTTPS} off
RewriteRule ^(.*)$ https://%{HTTP_HOST}%{REQUEST_URI} [L,R=301]
</IfModule>
Click the Save Change button and check for changes in redirection to see if it is working properly.
Once done, you’re all set. You have successfully redirected HTTP to HTTPS.
NOTE: Be careful while editing the .htaccess file because a small mistake can make your site inaccessible and it gives you an internal server error.
I recommend you download a copy of the .htaccess file on your computer in case something goes wrong.
Step 6: Update internal links in your content
Internal linking is a great way to inter-connect your articles. This helps readers learn more and reduce bounce rate.
As I told you ‘really simple SSL’ converts all HTTP to HTTPS. But you can still check your internal linking and update them if there are some.
Step 7: Add HTTPS version of your site to Google Search Console
It is really important to let Google know that you have now come to the HTTPS version.
To do this, you will need to add 2 more properties to your Search Console account.
The first one is: – https://yourdomain.com
And the second one is: –https://www.yourdomain.com
I hope you know how to add property. If you do not, enter the ‘Search Console’ dashboard. In the top left corner, you will see your existing property.

Now click the dropdown arrow. At the end of the dropdown, you’ll see the ‘Add property’ option.

Just click it and add your domain with HTTPS (https://yourdomain.com). Make sure you do it again to add https://www.yourdomain.com.
After verifying, you’ll see all different versions of your web properties.
- http://yourdomain.com
- http://www.yourdomain.com
- https://yourdomain.com
- https://www.yourdomain.com
You’ve almost done. The final thing to do is, submit your sitemap to the search console.
Step 8: Update your XML sitemap with HTTPS
It helps Google to the index HTTPS version of your domain faster than usual.
Before submitting a sitemap, create a sitemap containing the URL containing HTTPS.
If you don’t know how to do this, no worries, WordPress has made it easy for you.
The Yoast SEO plugin users have nothing to do as all URLs have already been replaced with HTTPS.
All you have to do is browse the HTTPS version of your sitemap by typing “https://yourdomain.com /post-sitemap.xml” (the URL is valid only for the Yoast SEO plugin users).
If you are getting all the URLs with HTTPS then you can copy this URL (https://yourdomain.com /post-sitemap.xml) and submit it to Google Search Console.
Congratulations !!! You have successfully redirected HTTP to HTTPS.
It was all about how you can redirect HTTP to HTTPS.
Now let’s discuss some additional things that you need to do after migrating from HTTP to HTTPS.
ADDITIONAL STEPS
STEP 9. Change your CDN URL
To be on the safe side, I would advise you to change the CDN URL.
Otherwise, your CDN server will not provide immediate results for your readers. The only way to fix the problem is to replace your CDN URL with SSL-CDN-URL.
If you do not know how to do this, do not worry here is everything you need to follow.
(Note: – Process is valid for MAXCDN users)
- First of all, login to the MAXCDN account
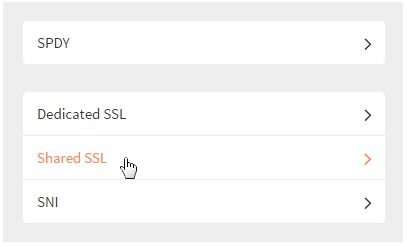
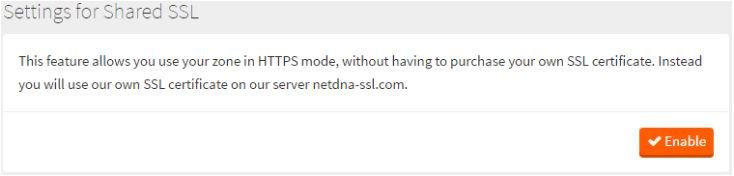
- Go to settings and click SSL corresponding to your domain’s pull zone.
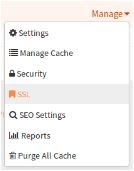
- Next, enable SSL for preferred hosting server (shared or dedicated hosting)
If you are using other CDN services, make sure you check their documentation or contact customer support and ask “How do I enable SSL?”.
STEP 10. Update Social Media profiles
Submitting XML Sitemaps in the Search Console helps Google to quickly index your HTTPS version and updating your social media profile also improves search visibility.
Change not only the social media profile but also the question-and-answer forum profile. Because these are your backlinks that Google will have to consider sooner than later.
STEP 11. Add HTTPS property to Google analytics
With the correct approach to this migration process, it is also important to add the HTTPS version of your domain name to your Google Analytics account.
Because with analytics, you can track your site performance, traffic, bounce rate, and real-time statistics.
And it is important to measure the performance of your site after redirecting HTTP to HTTPS.
To add the HTTPS version, you must log in to your Analytics account.
Once you are in, click on this gear icon shown below.

After clicking, you’ll see this admin interface…
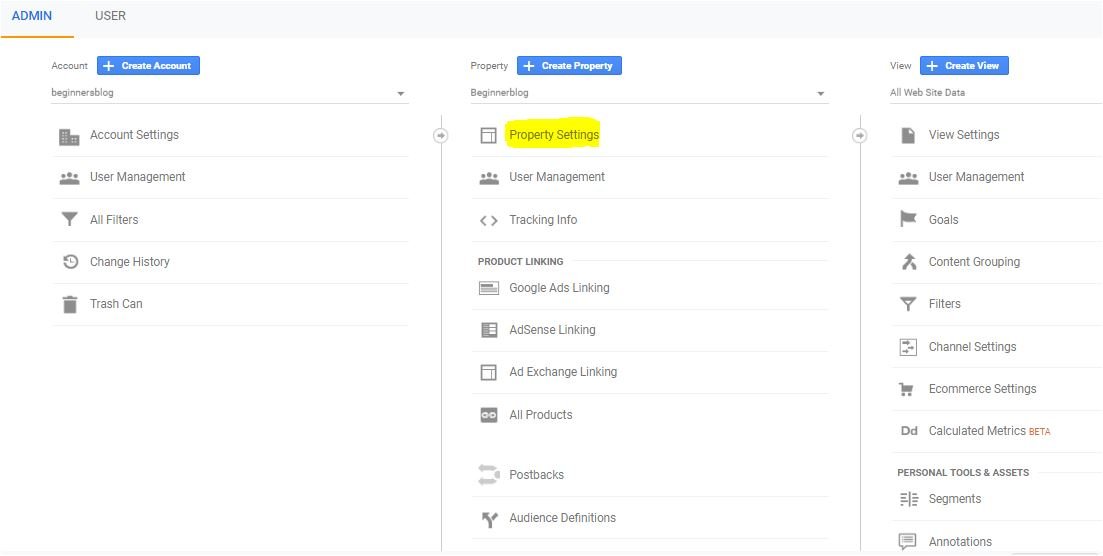
Next, go to the mid-section and click on the Property Settings option.
Here you see the default URL section. Click on the dropdown and choose HTTPS and save the changes.

Within 24 hours, Google Analytics will start collecting data from the HTTPS version of your site. Congratulations! You have successfully migrated from HTTP to HTTPS.
CONCLUSION
Now I would like to hear from you…
Are you going to use this guide to redirect HTTP to HTTPS? I did my best and I hope you now have enough knowledge to go one step further.
If you haven’t moved yet due to fear, I suggest you take your time reading this guide and I’m sure you can do it.
If you have further issues, ask me in the comments section. I will reply to you soon afterward.
Love this guide? Then don’t forget to share it with others on social media platforms.