
Let me guess. You tried ElevenLabs. The voice quality blew your mind. Then you looked at the pricing and realized you’d need to sell a kidney to generate voices at scale.
Here’s what most people don’t know: you’re paying $22/month for 100k characters (that’s about 90-120 minutes of audio). Need more? That’ll be $99/month. Creating audiobooks, YouTube videos, or bulk content? You’re looking at $200-$330/month, minimum.
It’s ridiculous.
But here’s the thing: there’s a completely free, open-source alternative that delivers the same quality. It’s called VibeVoice, and once you’ve got it set up, you can generate unlimited AI voices without spending a single dollar on subscriptions.
The catch? You need to install it yourself. And yeah, I know that sounds intimidating. But stick with me here. I’m going to walk you through this step-by-step, whether you’ve got a powerful gaming PC or a laptop that struggles to open Chrome.
By the end of this guide, you’ll have professional-quality AI voice generation running on your own system, or you’ll learn how to rent a powerful GPU for less than $0.50/hour. That’s cheaper than a gas station coffee, and you’ll only pay when you’re actually using it.
Let’s do this.
Why VibeVoice Is a Game-Changer
Before we jump into installation, let me break down why this matters:
- Zero Subscription Fees: Once installed, generate unlimited voices. No character limits. No monthly bills. Nothing.
- Same Quality as Premium Tools: VibeVoice uses state-of-the-art AI models. The voice quality rivals ElevenLabs, and in some cases, it’s even better.
- Complete Control: You own the setup. No cloud dependency. No privacy concerns. Your audio files never leave your computer.
- Perfect for Bulk Content: Creating audiobooks? YouTube narration? Podcast intros? Generate hours of content without watching your credit balance drain.
- Two Flexible Options: Run it on your local PC for instant access, or rent a powerful GPU on RunPod for pennies. Either way, you win.
The only “cost” is your time setting it up. And I’m about to make that as painless as possible.
What You Need to Know Before Starting
There are two ways to run VibeVoice:
Option 1: Local Installation (Windows) – If you have a Windows PC with an NVIDIA GPU (50 GB RAM ), this is the best route. Free forever after setup, fast processing, and everything runs on your machine.
Option 2: Cloud GPU on RunPod – Don’t have a powerful GPU? No problem. Rent one in the cloud for around $0.30-$0.50/hour. Only pay when you’re using it. Perfect for occasional use or testing.
GPU Specifications:
VibeVoice comes in two versions with different hardware needs. The smaller 1.5B model runs smoothly on consumer GPUs with just 8GB of VRAM (like an RTX 3060 or RTX 4060), making it accessible for most users. The larger 9B model delivers higher quality and more expressive voices but demands at least 18-19GB of VRAM (think RTX 3090, RTX 4090, or professional-grade GPUs). If you’re running on a tighter VRAM budget, there are quantized versions available that can run the 9B model on as little as 6-7GB of VRAM with minimal quality loss, though generation will be slightly slower.
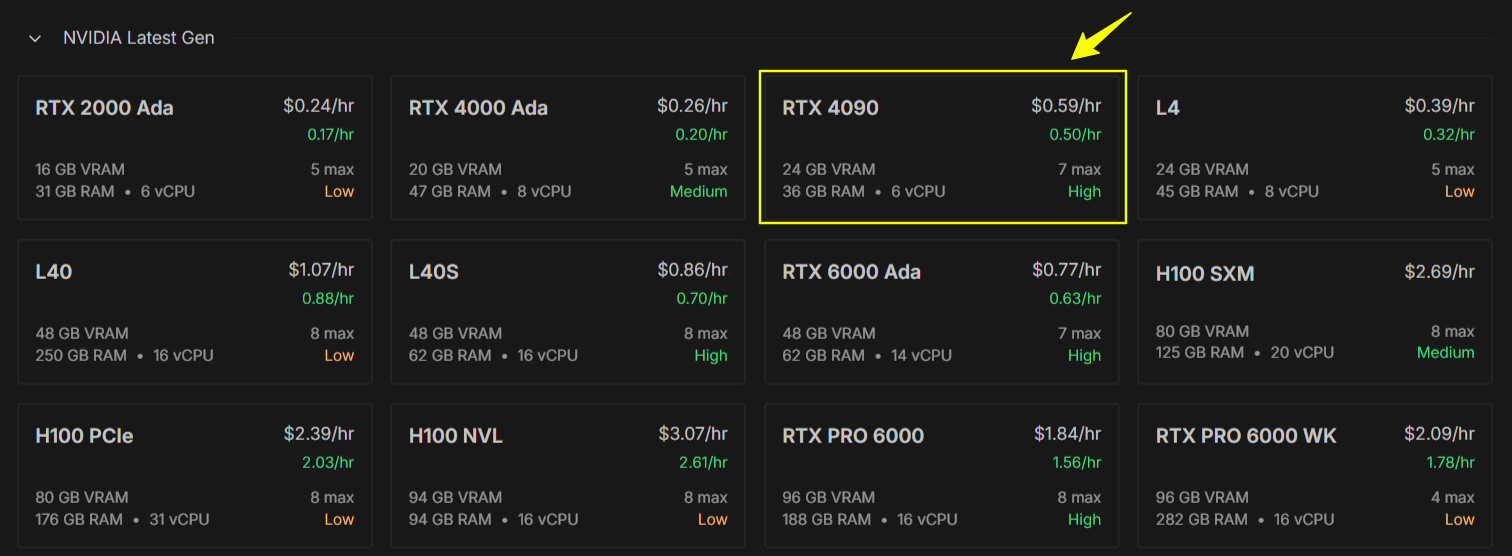
NOTE: My system has NVIDIA Geforce RTX 2050 GPU, which is not compatible with VibeVoice Model. I need to go with at least RTX 4060 GPU with 32 GB. That’s why I decided to use Runpod GPU: RTX 4090 (24 GB VRAM) 36 GB RAM • 6 vCPU Total Disk: 80 GB. And also added 20GB more to make sure everything run smoothly.

I’ll walk you through both. Pick whichever fits your situation.
First I am going to discuss how you can set it up on a virtual machine using RUNPOD. It’s 100% working method. It charges you only $0.59 for an hour. But in one hour you can generate almost 15 minutes of voice generation which is worth $20 monthly subscription of Elevenlabs.
Method One: Installing VibeVoice on RunPod (Cloud GPU)
If your computer doesn’t have a powerful NVIDIA GPU, or you just don’t want to deal with local installations, this is your path.
RunPod gives you access to professional GPUs in the cloud. You rent them by the hour, and you only pay when they’re running. Turn them off when you’re done, and the charges stop.
Why RunPod Is the Smart Choice
Let’s do some quick math:
- Buying an NVIDIA RTX 4090 GPU: $1,500-$2,000+
- Using RunPod for an hour: $0.30-$0.59
Even if you used RunPod for 10 hours a week, that’s around $20/month. Way cheaper than buying hardware, and you get access to top-tier GPUs.
Plus, no setup headaches. No driver issues. No hardware failures. Just pure AI processing power.
Step 1: Create a RunPod Account
Head over to RUNPOD and sign up.
They usually offer free credits for new users, so you can test things out without paying anything upfront.
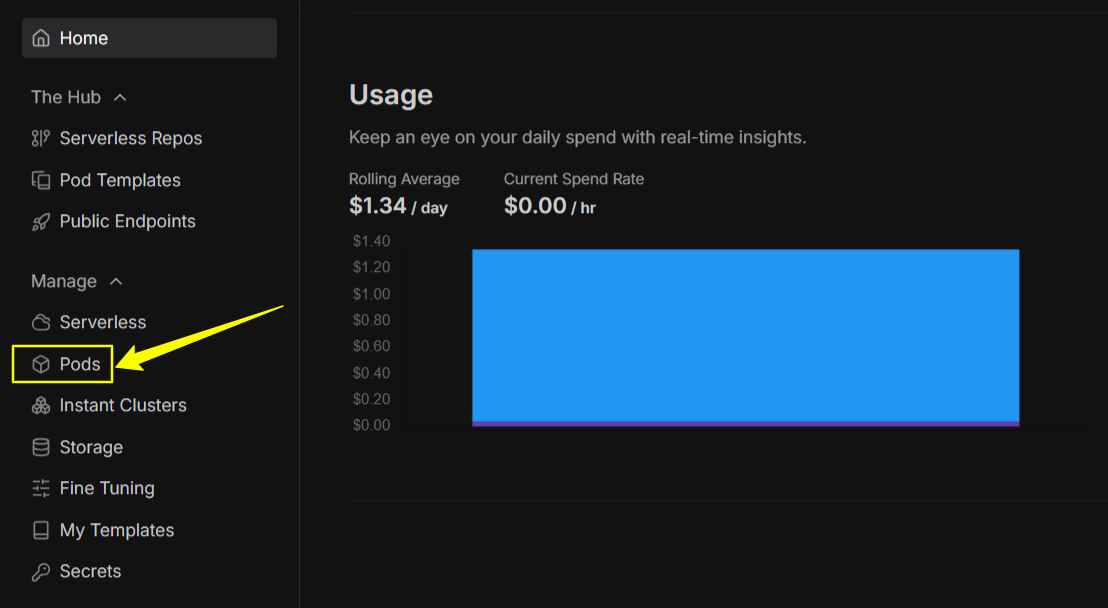
Step 2: Deploy a Pod
Once you’re logged in: Click “Pod”
Choose GPU with RTX 4090
Select the PyTorch 2.1 template from the options
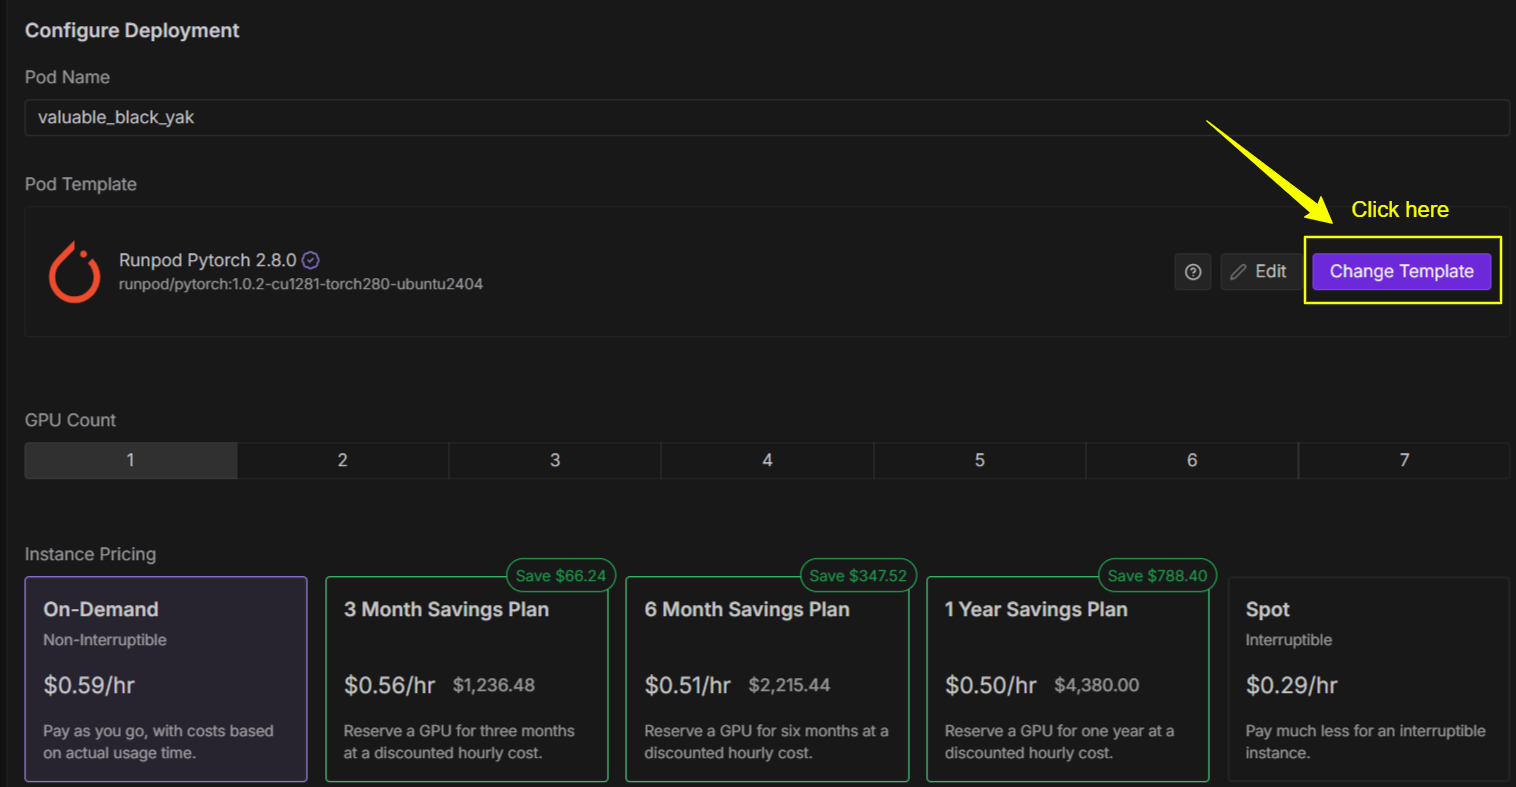

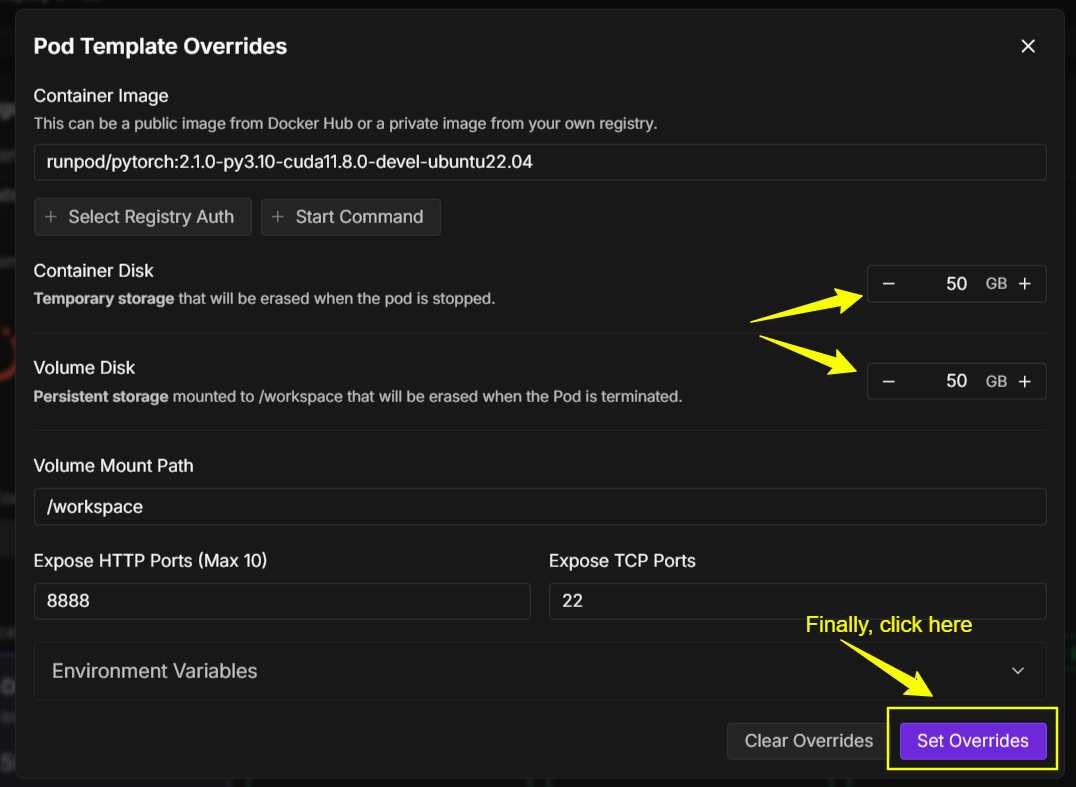
Next go back and “Edit” this and increase both containter and volume disk to 50 GB. Your template should look like this…
And finally click “Set Overrides”
Click “Deploy”

After that, you can click “Jupyter Lab” and it will redirect you do a terminal page where you need to run all commands below one by one.
Your pod will start spinning up. It takes about 30-60 seconds.
Once it’s running, click “Connect” and select “Start Web Terminal” or “SSH Terminal”. This opens a command line interface where you’ll run all your commands.
Step 3: Install System Packages
Your pod needs a few basic tools before we can install VibeVoice. Paste this into the terminal:
apt-get update
apt-get install -y build-essential ninja-build cmake ffmpeg git
This installs compilers, build tools, FFmpeg (for audio processing), and Git.
Hit Enter and let it run. It’ll take 1-2 minutes.
Step 4: Clone VibeVoice Repository
Now download VibeVoice:
git clone https://github.com/SUP3RMASS1VE/VibeVoiceTTS.git
cd VibeVoiceTTS
You’re now inside the VibeVoice folder on your cloud server.
Step 5: Set Up Python Virtual Environment
Create a clean Python environment:
python3 -m venv .venv
source .venv/bin/activate
The second command activates it. You’ll see (.venv) appear in your terminal prompt.
Now upgrade the core Python tools:
pip install -U pip setuptools wheel packaging
This ensures everything installs smoothly.
Step 6: Install All Dependencies
Time to install the AI libraries. This is similar to the local install, but with Linux commands.
Install UV
pip install uv
Install PyTorch with CUDA 12.8
uv pip install torch==2.8.0 torchvision torchaudio --index-url https://download.pytorch.org/whl/cu128
Note: We’re using torch 2.8.0 here instead of 2.7.0. RunPod works better with this version.
Install FlashAttention
uv pip install "flash-attn==2.8.3" --no-build-isolation
This optimizes attention mechanisms for faster processing.
Install VibeVoice
uv pip install -e .
This installs VibeVoice and all its remaining dependencies.
Let all of this run. It’ll take 5-10 minutes depending on your pod’s speed.
Step 7: Launch VibeVoice
You’re ready to fire it up:
python demo/gradio_demo.py --share
RunPod will generate a public URL (something like https://xxxxx.gradio.live). Copy that link and open it in your browser.
Boom. VibeVoice is running on a powerful cloud GPU, and you’re accessing it through your web browser.
Step 8: Managing Your Pod (Important!)
Here’s the thing about RunPod: you’re paying by the hour while your pod is running. So make sure when you are ready with everything like scripting and all, then install it so that you don’t waste time preparing after you install this setup becuase very minute count after you install it.
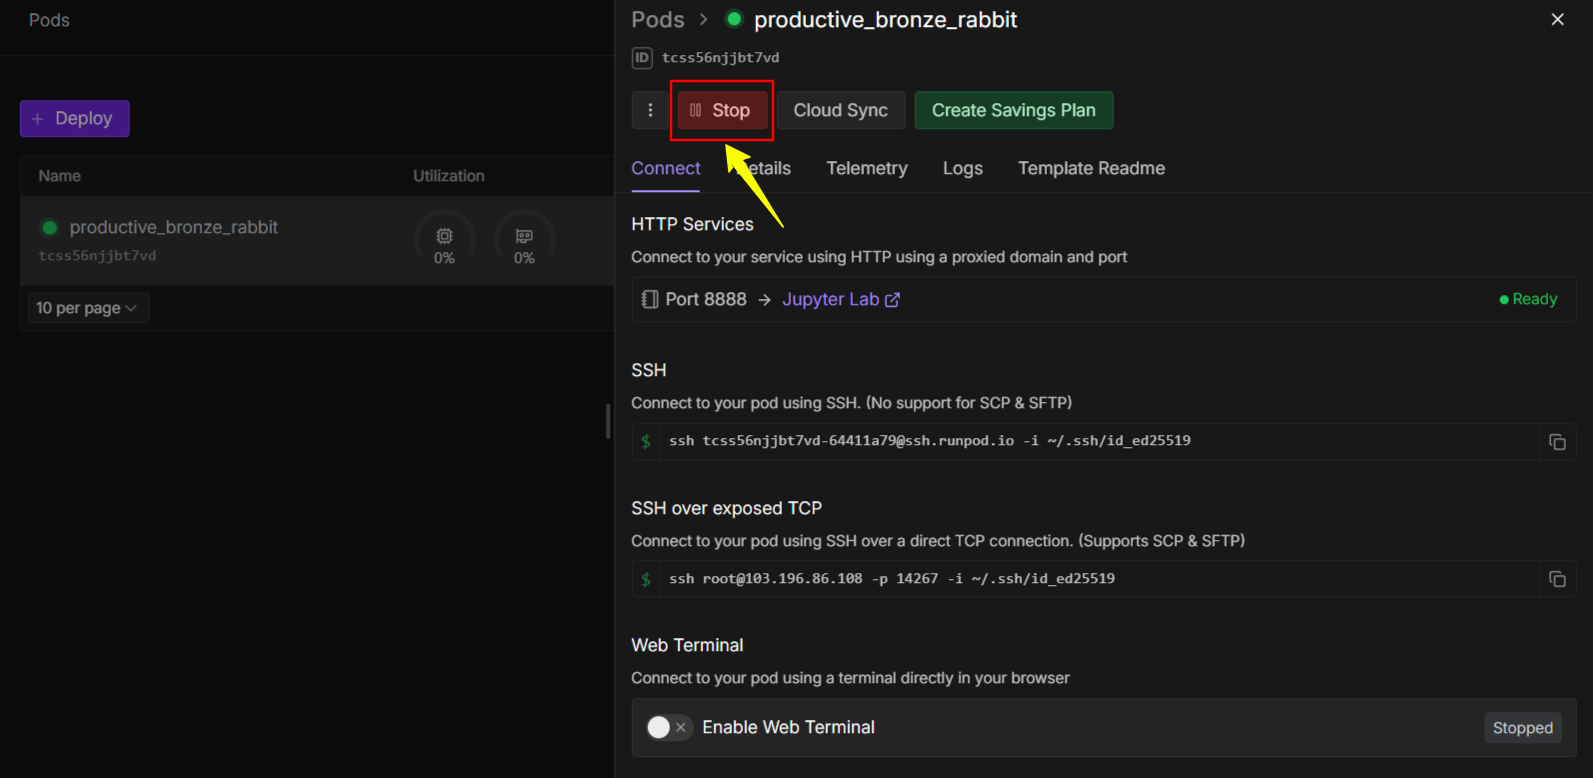
When you’re done using VibeVoice:
- Go back to the RunPod dashboard
- Click “Stop” and “Terminate” your pod
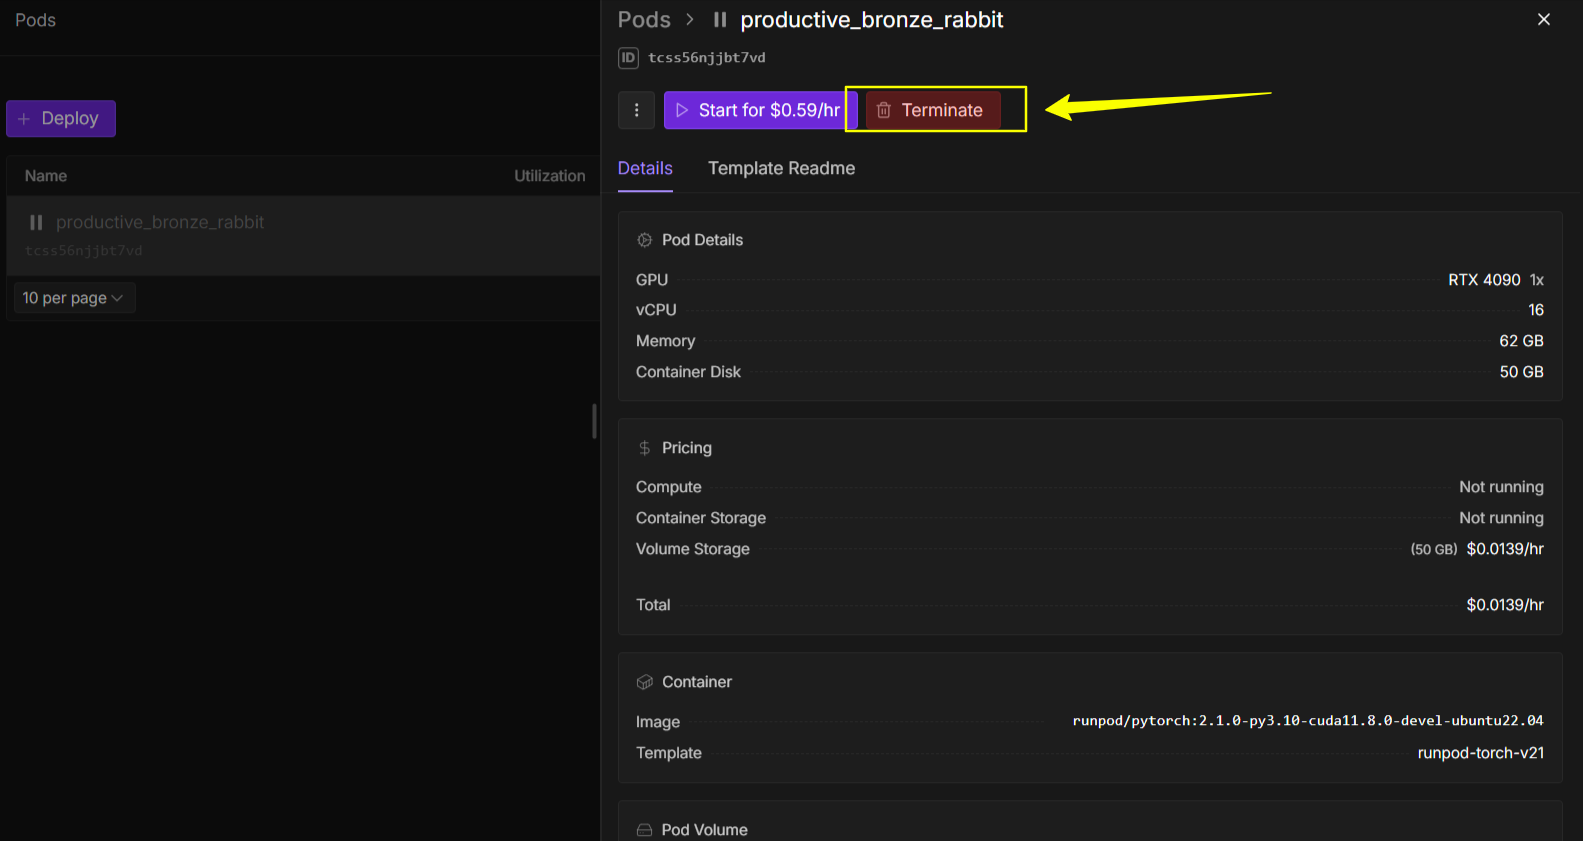
This stops the billing. Your setup will be saved, so you can restart the same pod later without reinstalling everything.
Once you stop it, you will see Terminate button that you can use to terminate this and re-install the system everytime you can ready to create 20 -30 minutes of voice. It’ll cose you only $0.59 instread $20 on ElevenLabs
Method 2: Installing VibeVoice on Your Local Windows PC
This is for you if you’ve got a Windows computer with an NVIDIA graphics card. You’ll need at least 32GB of VRAM for smooth performance, but 16GB can work for basic use.
Prerequisites: Get These Installed First
Don’t skip this part. These are the building blocks everything else needs.
1. Install Git
Git lets you download and manage code from the internet.
Download: https://git-scm.com/download/win
Just download the installer and click through it. Default settings are fine.
2. Install Python 3.10
VibeVoice runs on Python, so you need this exact version.
Download: https://www.python.org/downloads/release/python-31011/
IMPORTANT: When installing, check the box that says “Add Python to PATH.” This is critical. Don’t skip it.
3. Install NVIDIA CUDA Toolkit 12.8
CUDA lets your GPU handle AI processing. You need version 12.8 or newer.
Download: https://developer.nvidia.com/cuda-downloads
Pick your Windows version and follow the installer. It’s a big download (around 3GB), so give it time.
Once all three are installed, restart your computer. Seriously. Restart it. This ensures everything registers properly.
Step 1: Download VibeVoice
Open Command Prompt or PowerShell. Here’s how:
- Press
Windows + R - Type
cmdand hit Enter
Now navigate to wherever you want to install VibeVoice. For example, if you want it in your Documents folder:
cd Documents
Then clone the VibeVoice repository:
git clone https://github.com/SUP3RMASS1VE/VibeVoiceTTS.git
cd VibeVoiceTTS
This downloads all the VibeVoice files into a new folder called VibeVoiceTTS and opens it.
Step 2: Create a Virtual Environment
A virtual environment keeps all your Python packages organized and prevents conflicts with other software.
Run this:
python -m venv .venv
This creates a new folder called .venv inside your VibeVoiceTTS folder.
Now activate it:
.venv\Scripts\activate
You’ll see (.venv) appear at the start of your command line. That means it worked.
Step 3: Install All Dependencies
This is where we install all the AI libraries and tools VibeVoice needs. Copy and paste these commands one by one.
Install UV Package Manager
pip install uv
UV is faster than regular pip. It’ll speed up the rest of the installation.
Install PyTorch with CUDA Support
uv pip install torch==2.7.0 torchvision torchaudio --index-url https://download.pytorch.org/whl/cu128
This installs PyTorch (the AI framework) with CUDA 12.8 support so your GPU can do the heavy lifting.
Install Triton
uv pip install triton-windows
Triton helps optimize GPU performance.
Install FlashAttention
uv pip install https://github.com/petermg/flash_attn_windows/releases/download/01/flash_attn-2.7.4.post1+cu128.torch270-cp310-cp310-win_amd64.whl
FlashAttention makes AI processing way faster. This is a pre-built Windows version.
Install VibeVoice and Its Dependencies
uv pip install -e .
This installs VibeVoice itself along with everything else it needs.
Each of these will take a few minutes. Grab a drink. Let it run.
Step 4: Download the Launcher Script
The launcher makes starting VibeVoice super easy. Instead of typing commands every time, you’ll just double-click a file.
curl -L -o LAUNCHER_VibeVoice.bat "https://huggingface.co/Aitrepreneur/FLX/resolve/main/LAUNCHER_VibeVoice.bat?download=true"
This downloads a .bat file into your VibeVoiceTTS folder.
Step 5: Launch VibeVoice
Find the LAUNCHER_VibeVoice.bat file in your VibeVoiceTTS folder and double-click it.
A command window will pop up, do some loading, and then your web browser will automatically open to the VibeVoice interface.
That’s it. You’re done. VibeVoice is running on your local machine.
Now you can start generating voices, training custom models, or experimenting with different settings. All free. All unlimited.
Bonus: Installing RVC WebUI (Voice Conversion Tool)
VibeVoice generates amazing voices, but if you want to convert existing audio or clone specific voices, you’ll want RVC (Retrieval-based Voice Conversion).
Here’s how to set it up alongside VibeVoice.
RVC on Windows
Step 1: Install Prerequisites
You need:
- 7-Zip: https://www.7-zip.org/
- Git: (you already have this from the VibeVoice install)
Step 2: Download RVC
Pick the version for your GPU:
NVIDIA GPU: https://huggingface.co/lj1995/VoiceConversionWebUI/resolve/main/RVC1006Nvidia.7z
AMD or Intel GPU: https://huggingface.co/lj1995/VoiceConversionWebUI/resolve/main/RVC1006AMD_Intel.7z
Step 3: Extract the Files
Right-click the downloaded .7z file and select “7-Zip > Extract Here”
You’ll get a folder called RVC1006Nvidia (or AMD_Intel version).
Step 4: Run RVC
Open that folder and double-click go-web.bat
That’s it. RVC will launch in your browser.
RVC on RunPod
If you’re using RunPod, here’s how to set up RVC:
Step 1: Open Terminal
Connect to your RunPod terminal (same as before).
Step 2: Update System
apt update && apt upgrade -y
Step 3: Download and Extract RVC
cd /workspace
wget https://huggingface.co/lj1995/VoiceConversionWebUI/resolve/main/RVC1006Nvidia.7z
apt install p7zip-full -y
7z x RVC1006Nvidia.7z
cd RVC1006Nvidia
Step 4: Install Dependencies
apt update && apt upgrade -y
pip install --force-reinstall -v "av==11.0.0"
pip install matplotlib==3.7.0
pip install -r requirements.txt
Step 5: Launch RVC
python infer-web.py
RVC will start running. Check your RunPod dashboard for the web interface link.
Bonus: Installing ComfyUI (Advanced Workflows)
ComfyUI is a node-based interface for AI workflows. If you want to create complex voice generation pipelines or combine VibeVoice with other AI tools, this is where you’d do it.
ComfyUI on Windows
Step 1: Download ComfyUI
Go to the latest release: https://github.com/comfyanonymous/ComfyUI/releases/latest
Download the portable NVIDIA build (it’s a big file, around 5-7GB).
Step 2: Extract Everything
Use 7-Zip to extract it. You’ll get a folder structure like this:
ComfyUI_windows_portable/
├── ComfyUI/
│   ├── models/
│   └── custom_nodes/
├── python_embeded/
└── run_nvidia_gpu.bat
Step 3: Install Custom Nodes
Open Command Prompt and navigate to:
cd ComfyUI_windows_portable\ComfyUI\custom_nodes
Clone these essential nodes:
git clone https://github.com/ltdrdata/ComfyUI-Manager.git
git clone https://github.com/rgthree/rgthree-comfy
git clone https://github.com/Enemyx-net/VibeVoice-ComfyUI
git clone https://github.com/diodiogod/TTS-Audio-Suite
Step 4: Install Node Dependencies
Some custom nodes need extra Python packages. For each node folder that has a requirements.txt file, run:
..\..\python_embeded\python.exe -m pip install -r [node_folder]\requirements.txt
For example:
..\..\python_embeded\python.exe -m pip install -r VibeVoice-ComfyUI\requirements.txt
Step 5: Launch ComfyUI
Go back to ComfyUI_windows_portable and double-click run_nvidia_gpu.bat
ComfyUI will open in your browser.
ComfyUI on RunPod
Step 1: Create RunPod Pod
Sign in to RunPod and deploy a pod with:
- At least 24GB VRAM (like RTX 3090 or A5000)
- aitrepreneur/comfyui template (if available)
- Access port 8888
Step 2: Install System Packages
apt-get update
DEBIAN_FRONTEND=noninteractive apt-get install -y \
  git git-lfs curl ffmpeg portaudio19-dev libasound2-dev \
  build-essential ninja-build cmake
git lfs install
Step 3: Set Up Python Environment
cd /workspace/ComfyUI
python3 -m venv venv
source venv/bin/activate
pip install -U pip uv wheel setuptools
export UV_LINK_MODE=copy
export PYTHONNOUSERSITE=1
unset PYTHONPATH
Step 4: Install PyTorch
uv pip install --upgrade torch torchvision torchaudio --index-url https://download.pytorch.org/whl/cu128
uv pip uninstall -y xformers
Step 5: Clone Custom Nodes
cd custom_nodes
git clone https://github.com/diodiogod/TTS-Audio-Suite
git clone https://github.com/Enemyx-net/VibeVoice-ComfyUI
git clone https://github.com/rgthree/rgthree-comfy
Step 6: Install Python Dependencies
This is a big one. Run this entire command:
uv pip install \
  "numpy==2.2.6" \
  "librosa==0.11.0" \
  "soundfile>=0.12.0" \
  "sounddevice>=0.4.0" \
  "accelerate>=1.6.0" \
  "transformers==4.51.3" \
  "diffusers==0.35.1" \
  "scipy" \
  "ml-collections" \
  "peft>=0.17.0" \
  "huggingface_hub>=0.25.1" \
  "absl-py" \
  "aiortc==1.13.0" \
  "av==14.4.0" \
  "bitsandbytes==0.47.0" \
  "conformer==0.3.2" \
  "x-transformers==2.7.6" \
  "torchdiffeq==0.2.5" \
  "wandb==0.21.4" \
  "ema-pytorch==0.7.7" \
  "vocos==0.1.0" \
  "monotonic-alignment-search==0.2.0" \
  "faiss-cpu>=1.7.4" \
  "praat-parselmouth>=0.4.6" \
  "pyworld==0.3.5" \
  "torchfcpe==0.0.4" \
  "opencv-python-headless==4.12.0.88" \
  "pillow" \
  "datasets==4.0.0" \
  "requests" \
  "dacite==1.9.2" \
  "unidecode==1.4.0" \
  "jieba==0.42.1" \
  "pypinyin==0.55.0" \
  "torchsde==0.2.6"
Let this run. It’ll take 10-15 minutes.
Step 7: Download HuBERT Model
HuBERT is needed for voice processing:
mkdir -p custom_nodes/TTS-Audio-Suite/models/hubert
curl -L -o custom_nodes/TTS-Audio-Suite/models/hubert/hubert_base.pt \
  https://huggingface.co/lj1995/VoiceConversionWebUI/resolve/main/hubert_base.pt
Create a symbolic link so both nodes can access it:
mkdir -p custom_nodes/VibeVoice-ComfyUI/models
ln -sf ../TTS-Audio-Suite/models/hubert/hubert_base.pt \
  custom_nodes/VibeVoice-ComfyUI/models/hubert_base.pt
Step 8: Run ComfyUI
Start the server (the specific command depends on your RunPod template setup, but typically):
python main.py --listen 0.0.0.0 --port 8188
Access it through your RunPod’s web interface URL.
Which Setup Is Right for You?
Let me break this down:
- Just Want Voice Generation?: Install VibeVoice only. It’s the simplest setup and handles all your text-to-speech needs.
- Want Voice Conversion Too?: Install VibeVoice + RVC. You’ll be able to generate voices AND convert/clone existing audio.
- Want Advanced AI Workflows?: Install ComfyUI with VibeVoice nodes. This gives you maximum flexibility but has the steepest learning curve.
- Not Sure Yet?: Start with VibeVoice on RunPod. Test it out for a few hours, see if it fits your needs, then decide if you want to invest in a local setup.
Final Thoughts
Look, I get it. This seems like a lot. Installation guides, terminal commands, dependencies… it’s enough to make anyone want to just stick with their ElevenLabs subscription.
But here’s the truth: once you push through this initial setup, you’ll have unlimited AI voice generation at your fingertips. No credits. No monthly fees. No restrictions.
Think about what you could do with that:
- Create an entire audiobook series without worrying about costs
- Generate voiceovers for hundreds of YouTube videos
- Experiment with different voices and styles without burning through credits
- Build voice AI products without subscription overhead
The setup takes an hour or two. Maybe a bit longer if you hit some bumps. But that’s a one-time investment that pays dividends forever.
And if you run into issues? That’s normal. Everyone hits snags. The key is to just take it one step at a time. Follow the commands exactly as written. Google any error messages you see. You’ll figure it out.
You’ve got this. And once you’re up and running, you’ll wonder why you ever paid for voice generation in the first place.
Now go build something amazing.


3 thoughts on “Stop Paying $200/Month for AI Voices: Here’s How to Generate Unlimited Audio for Free”
Hey, what should be a suitable laptop configuration, to run this setup locally? Thanks for answering.
At least 24 GB vRAM and extra 20 GB system RAM to run it smoothly.
This is really interesting, You’re a very skilled blogger. I’ve joined your feed and look forward to seeking more of your magnificent post. Also, I’ve shared your site in my social networks!