Your blog or website has been updated recently, but some pages don’t seem to load properly. What happened? Did something go wrong?
If you’ve ever tried to update a page on your site, you might have noticed that sometimes it takes a long time before the new version loads. This happens because your browser stores information about previous visits to your site.
This cache is usually cleared automatically after a certain period of time. But clearing your WordPress cache is important if you want to see the changes you’ve made to your site immediately.
In fact, you should also clear your browser cache every once in a while. It’s not always necessary, but it can be helpful for debugging problems with your site & clearing the temporary storage of your site.
And this tutorial covers how to clear your WordPress cache and get rid of all those old versions of your site.
Before you begin, you need to clear your browser cache.
This is how you can do this…
How To Clear Cache & Browsing Data
First, Open up Google Chrome and click on the menu icon located at the top right corner of the browser.
Second, Click on “More Tools”
Third, Select “Clear browsing data…” from the drop-down list. Once you click that, a popup will appear where you can select the time range and also check browser history, cookies and other site data and cached image and file.
Once you have selected all options, hit ‘Clear data’ button. And within a few seconds, it will clear browser history data and cached files.
Lastly, you can open your web browser again and refresh the page to view any changes.
Once you’re done, it’s time to move to the main part of this tutorial. Now let’s start clearing your WordPress cache.
What is Caching in WordPress?
Caching is basically storing copies of the most frequently accessed resources so that they won’t need to be re-downloaded each time a visitor views your site.
When someone visits your site, they request a webpage from your server. The web server then sends back the requested file to the visitor’s browser.
The problem is that when a user requests a page, the web server doesn’t know what content will be displayed on the page until the page actually gets loaded into the browser. So the first time a visitor comes to your site, the web server needs to send the entire HTML code for the page to the browser.
After the page is sent, the browser displays the page as soon as possible. However, there are still parts of the page that need to be downloaded again. For example, images, CSS files, JavaScript files, and other resources.
So, even though the page was already sent to the visitor, the browser still needs to download these additional resources. That means that the next time the same person visits your site, the browser only downloads the resources that were changed since the last visit.
Why do I Need to Clear My WordPress Cache?
When you make updates to your site, you may notice that visitors aren’t seeing the latest version right away. Sometimes this delay is caused by an outdated cache.
For example, let’s say you just added a new feature to your site. You’re sure that everything looks great, but visitors are still seeing the old version of the page.
That’s because your browser keeps a copy of the page that was previously visited. If you haven’t cleared your cache yet, your browser will keep sending the older version of the page to the visitor.
So, clearing your WordPress cache is useful when you’re making changes to your WordPress site and want to see them apply in real-time. You’ll need to clear the cache so it can save the new data or content you’ve added. This process clears the temporary storage of your website and allows you to view the latest updates.
Helpful Resource – How To Reduce HTTPS Requests To Speed Up Your Website
How to Clear WordPress Cache: 4 Simple Method
WordPress Clear Cache Using FTP
If you don’t have access to your hosting account, you can use a different method to clear your WordPress cache.
It’s called “FTP”
To do this, log in to your FTP client and navigate to the WP-content > “Cache”. And delete all the files inside the cache folder.
NOTE: Please don’t delete the folder itself. You need to delete the files inside Cache folder.
How to Clear Cache in WordPress Using a Dedicated Plugin
Clearing your WordPress cache using a plugin is easier than the above one. Because you don’t need to work with sensitive files and server data.
Here are 3 best plugins that you can use to clear WordPress cache
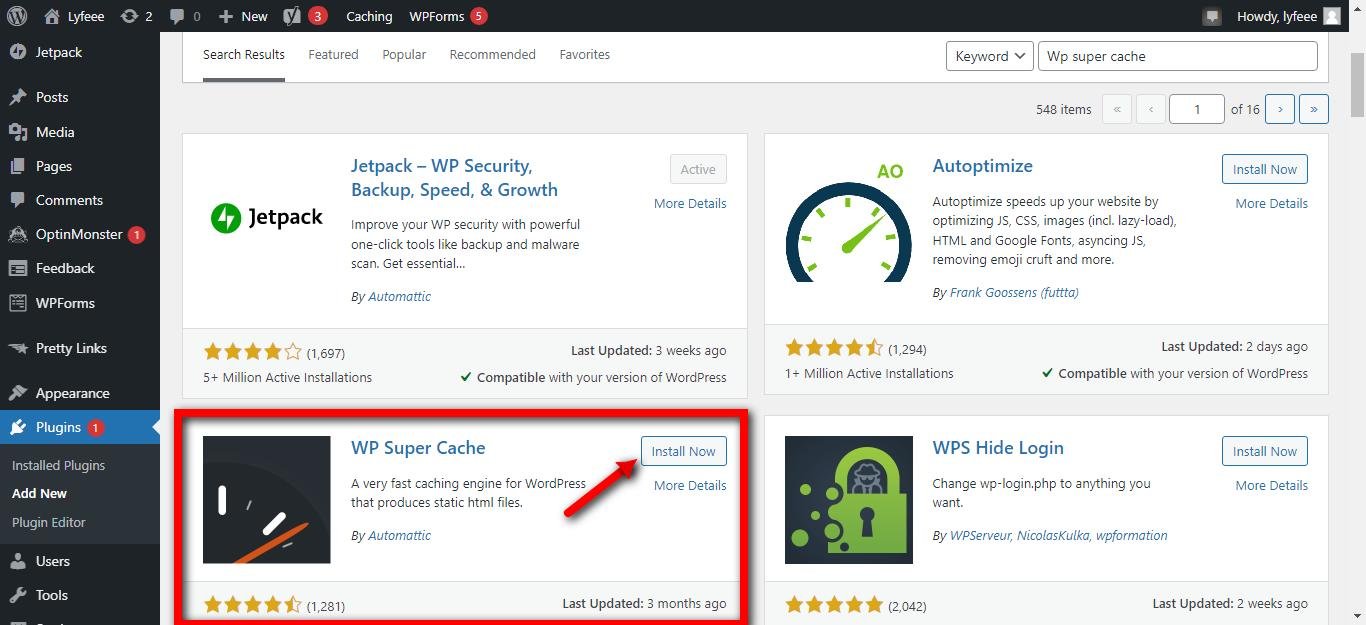
WP super cache – WP Super Cache is a free plugin that makes it possible to create static HTML pages for your site. This means that you will save bandwidth by having fewer requests made to your server. It also means that your visitors will experience faster page loads.
W3 Total Cache – It is a free caching plugin which can help you to speed up your websites using a CDN integration.
WP Rocket – It is a premium caching plugin which optimizes your WordPress sites and help you clear cache faster.
You can choose one of above plugins to fix your WordPress cache. Let’s take ‘WP super cache’ as an example.
Clear cache in WordPress Using “WP Super Cache”
First, install WP super cache on to your WordPress site.
After installing, activate the plugin and go to plugin configuration page
Enable caching option and then click the “Update status” and delete the cache. That’s it!
The reason why I love using this plugin because it’s a free plugin that allows you to set a time limit on how long your site will remain cached. You can adjust the number of hours you want your site to stay cached.
Another useful feature of WP Super Cache is that it lets you choose whether you want to serve static files from your server or from your CDN (content delivery network). This means that if you’ve got a CDN like Cloudflare, you can tell WP Super Cache to serve those files directly from your CDN instead of having them served from your web host.
Clear cache using WP Rocket
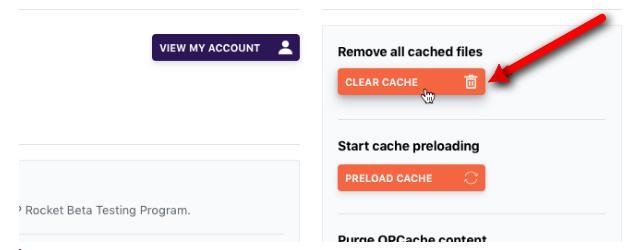
Make sure you have the WP-Rocket plugin installed and active. If it is not, go to your WordPress dashboard and activate it. Then clear all caches by clicking the “Clear Cache” button at the bottom of the page.
Clear Cache Using W3 Total Cache
First of all, install W3 Total Cache plugin and activate it. Next, Go to Performance > Dashboard and press the ‘Empty all caches’ button. This will delete all cached content from your WordPress site.
Clear Cache in Your WordPress Hosting
Modern hosting provider comes with built-in caching options. So, there is no need to install any extra plugin. You can easily manage your cache settings via cPanel or WordPress Admin area.
Let’s see how you can clear cache in WordPress.
Clear Cache in WP Engine
WP Engine comes with its own built-in caching solution, it means you don’t have to install any cache plugin.
All you have to do is login to your WordPress dashboard and head over to WP Engine option from the WordPress admin menu.
Clear Cache in Bluehost
Bluehost is one of my favorite hosting provider. Similar to WP engine, they also provide their users with their own built-in caching system which allow you to clear the cache right from the WordPress dashboard.
Final Thoughts
Clearing your WordPress cache is the best move towards WordPress optimization. It helps to reduce the load on your servers. And, it makes your website more responsive.
So, make sure you clear your cache regularly. This can help you optimize your websites for better performance.
Most importantly, it helps you save bandwidth and boost your site loading speed. So, keep your cache clean and enjoy faster loading times.
I hope these tips helped you to clear your WordPress cache. Please share your experience in comments below. And also, let me know what else you missed about clearing WordPress cache?
**If you liked this post, please do share it on Facebook, Pinterest, Twitter and LinkedIn


